插件体系
插件系统允许您通过添加各类插件来扩展 Location 的功能,支持鉴权、流控、响应头设置等多种场景。通过插件,您可以灵活地定制请求处理流程。
插件执行时点
插件可以在请求处理的不同阶段执行,目前支持以下三个时点:
-
Request: 请求最开始阶段- 适用于权限验证等需要早期拦截的场景
-
ProxyUpstream: 转发至上游节点之前- 在读取缓存之后执行
- 适用于需要限制上游访问但允许缓存访问的场景
- 例如:限制对上游的请求频率,但允许高并发读取缓存
-
Response: 上游响应之后- 用于处理和修改上游返回的响应数据
#[async_trait]
pub trait Plugin: Sync + Send {
    /// Returns a unique key that identifies this specific plugin instance.
    ///
    /// # Purpose
    /// - Can be used for caching plugin results
    /// - Helps differentiate between multiple instances of the same plugin type
    /// - Useful for tracking and debugging
    ///
    /// # Default
    /// Returns an empty string by default, which means no specific instance identification.
    fn hash_key(&self) -> String {
        "".to_string()
    }

    /// Processes an HTTP request at a specified lifecycle step.
    ///
    /// # Parameters
    /// * `_step` - Current processing step in the request lifecycle (e.g., pre-routing, post-routing)
    /// * `_session` - Mutable reference to the HTTP session containing request data
    /// * `_ctx` - Mutable reference to the request context for storing state
    ///
    /// # Returns
    /// * `Ok((executed, response))` where:
    ///   * `executed` - Boolean flag:
    ///     - `true`: Plugin performed meaningful logic for this request
    ///     - `false`: Plugin was skipped or did nothing for this request
    ///   * `response` - Optional HTTP response:
    ///     - `Some(response)`: Terminates request processing and returns this response to client
    ///     - `None`: Allows request to continue to next plugin or upstream
    /// * `Err` - Returns error if plugin processing failed
    async fn handle_request(
        &self,
        _step: PluginStep,
        _session: &mut Session,
        _ctx: &mut Ctx,
    ) -> pingora::Result<(bool, Option<HttpResponse>)> {
        Ok((false, None))
    }

    /// Processes an HTTP response at a specified lifecycle step.
    ///
    /// # Parameters
    /// * `_step` - Current processing step in the response lifecycle
    /// * `_session` - Mutable reference to the HTTP session
    /// * `_ctx` - Mutable reference to the request context
    /// * `_upstream_response` - Mutable reference to the upstream response header
    ///
    /// # Returns
    /// * `Ok(modified)` - Boolean flag:
    ///   - `true`: Plugin modified the response in some way
    ///   - `false`: Plugin did not modify the response
    /// * `Err` - Returns error if plugin processing failed
    async fn handle_response(
        &self,
        _step: PluginStep,
        _session: &mut Session,
        _ctx: &mut Ctx,
        _upstream_response: &mut ResponseHeader,
    ) -> pingora::Result<bool> {
        Ok(false)
    }
}
主要分三个实现:
category: 插件类型,用于区分该插件是哪类形式的插件step: 插件的执行时序,按需选择插件的执行时序,不同的插件可选择的选择不一样handle_request: 插件的转发前执行逻辑,若返回的是Ok(Some(HttpResponse)),则表示请求已处理完成,不再转发到上游节点,并将该响应传输至请求端handle_response: 插件的响应前执逻辑,若返回的是Ok(true),则表示该插件被成功执行
Stats 性能统计插件
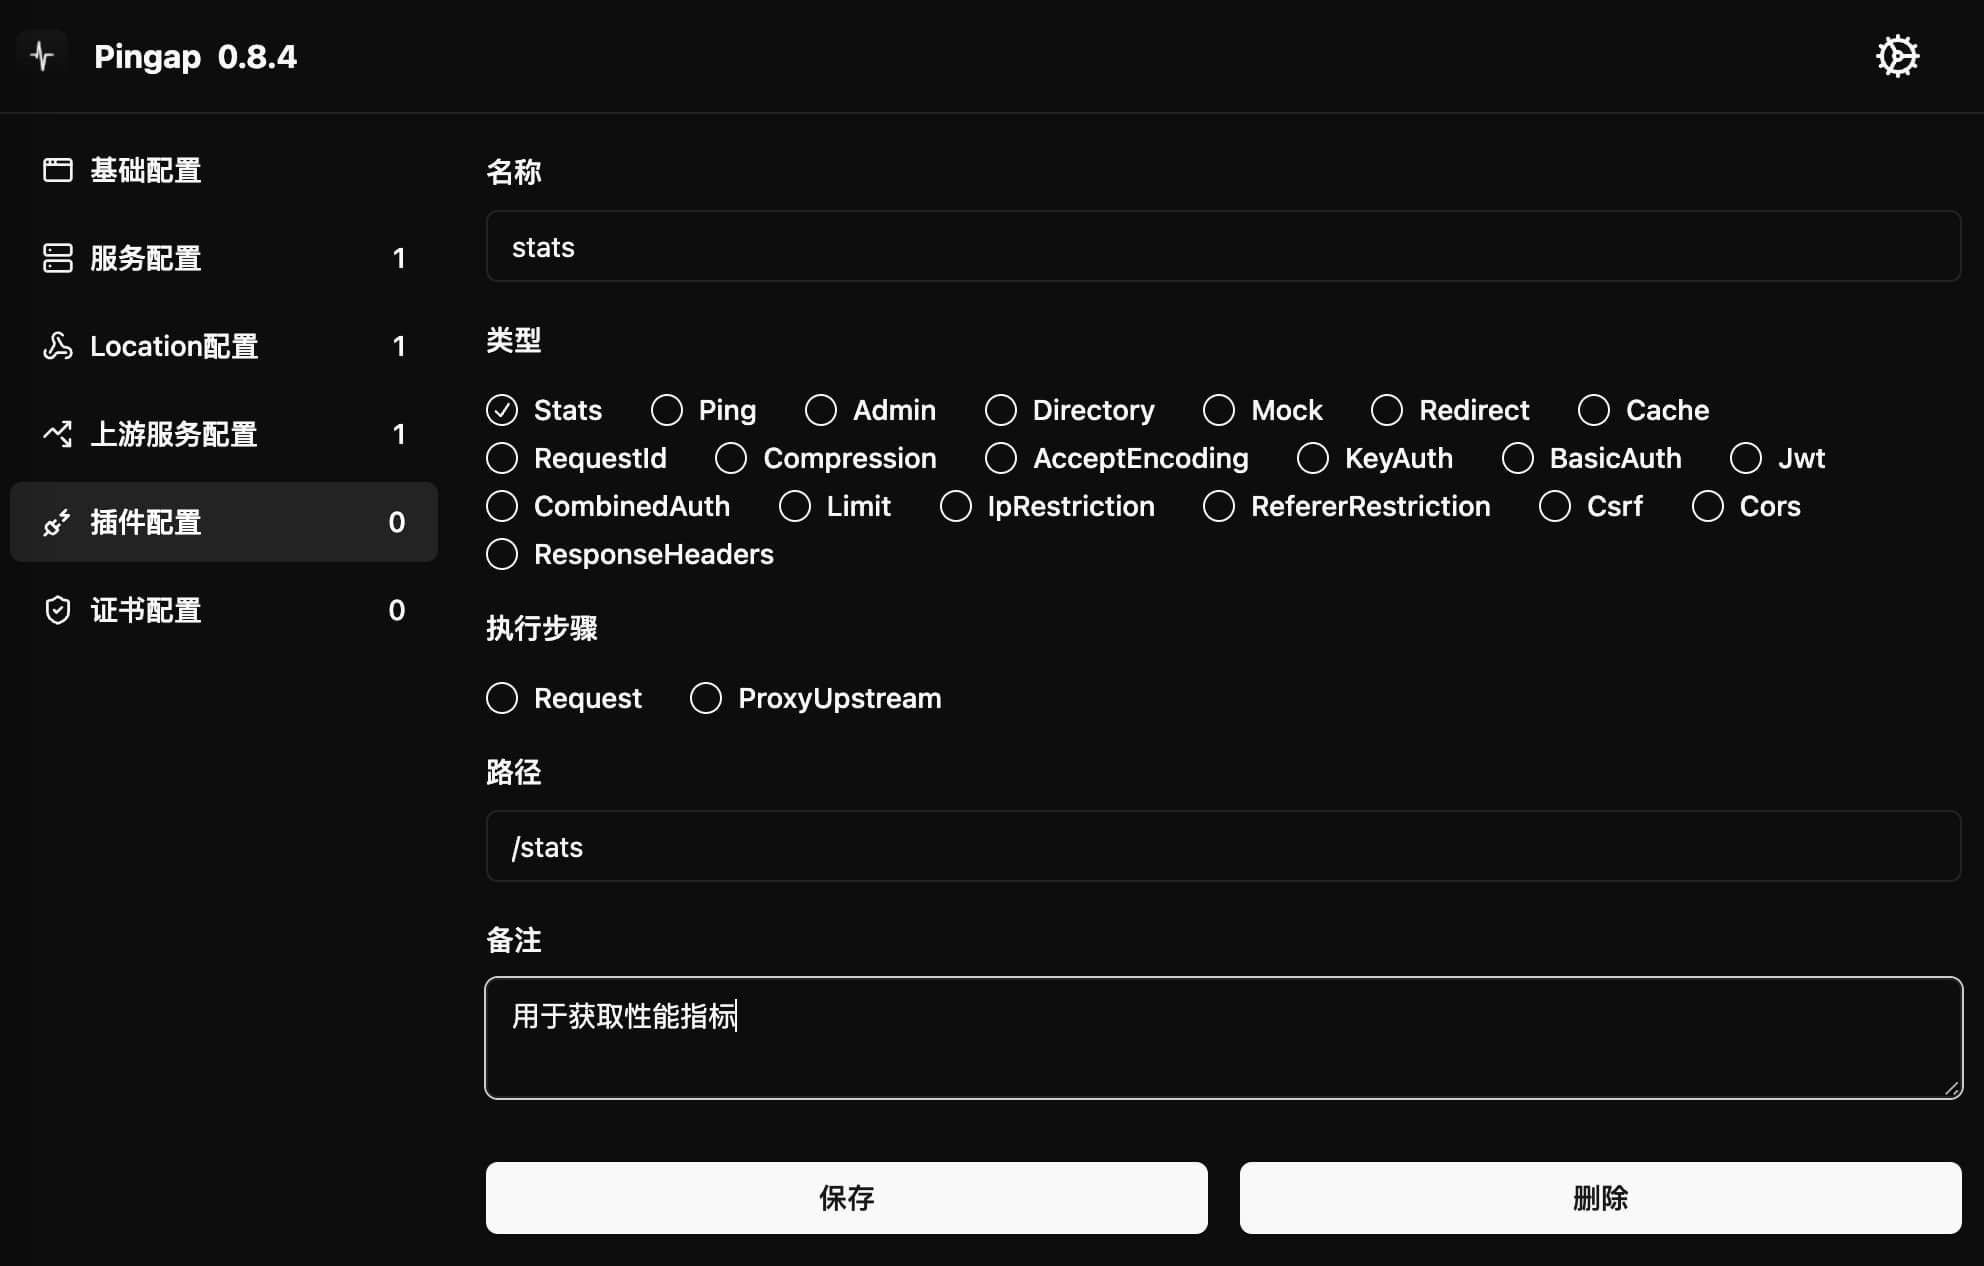
Stats插件用于暴露应用的性能指标数据,方便第三方系统采集监控。可以通过以下两种方式使用:
- 使用内置的
pingap:stats插件 - 自定义配置新的 Stats 插件
配置示例
[plugins.stats]
category = "stats"
path = "/stats"  # 访问路径
remark = "性能指标采集"
配置参数
path: 指标数据访问路径,如配置为/stats则可通过该路径获取性能指标step: 插件执行时机,可选request或proxy_upstream
使用方式
配置完成后,��可以通过访问对应 location 下的 /stats 路径获取性能指标数据。
Ping
Ping插件提供了一个简单的健康检查端点,用于监控服务是否正常运行。当配置了反向代理时,也可以作为 pingap 的健康检查机制,该插件固定执行在request阶段。
[plugins.pingpong]
category = "ping"
path = "/ping"  # 健康检查路径
配置参数
path: 健康检查的访问路径,访问该路径时会返回 "pong" 响应step: 插件执行时机,仅支持request阶段
使用方式
配置完成后,访问对应的 path 路径(如 /ping)即可获得 "pong" 响应,用于验证服务是否存活。
Admin
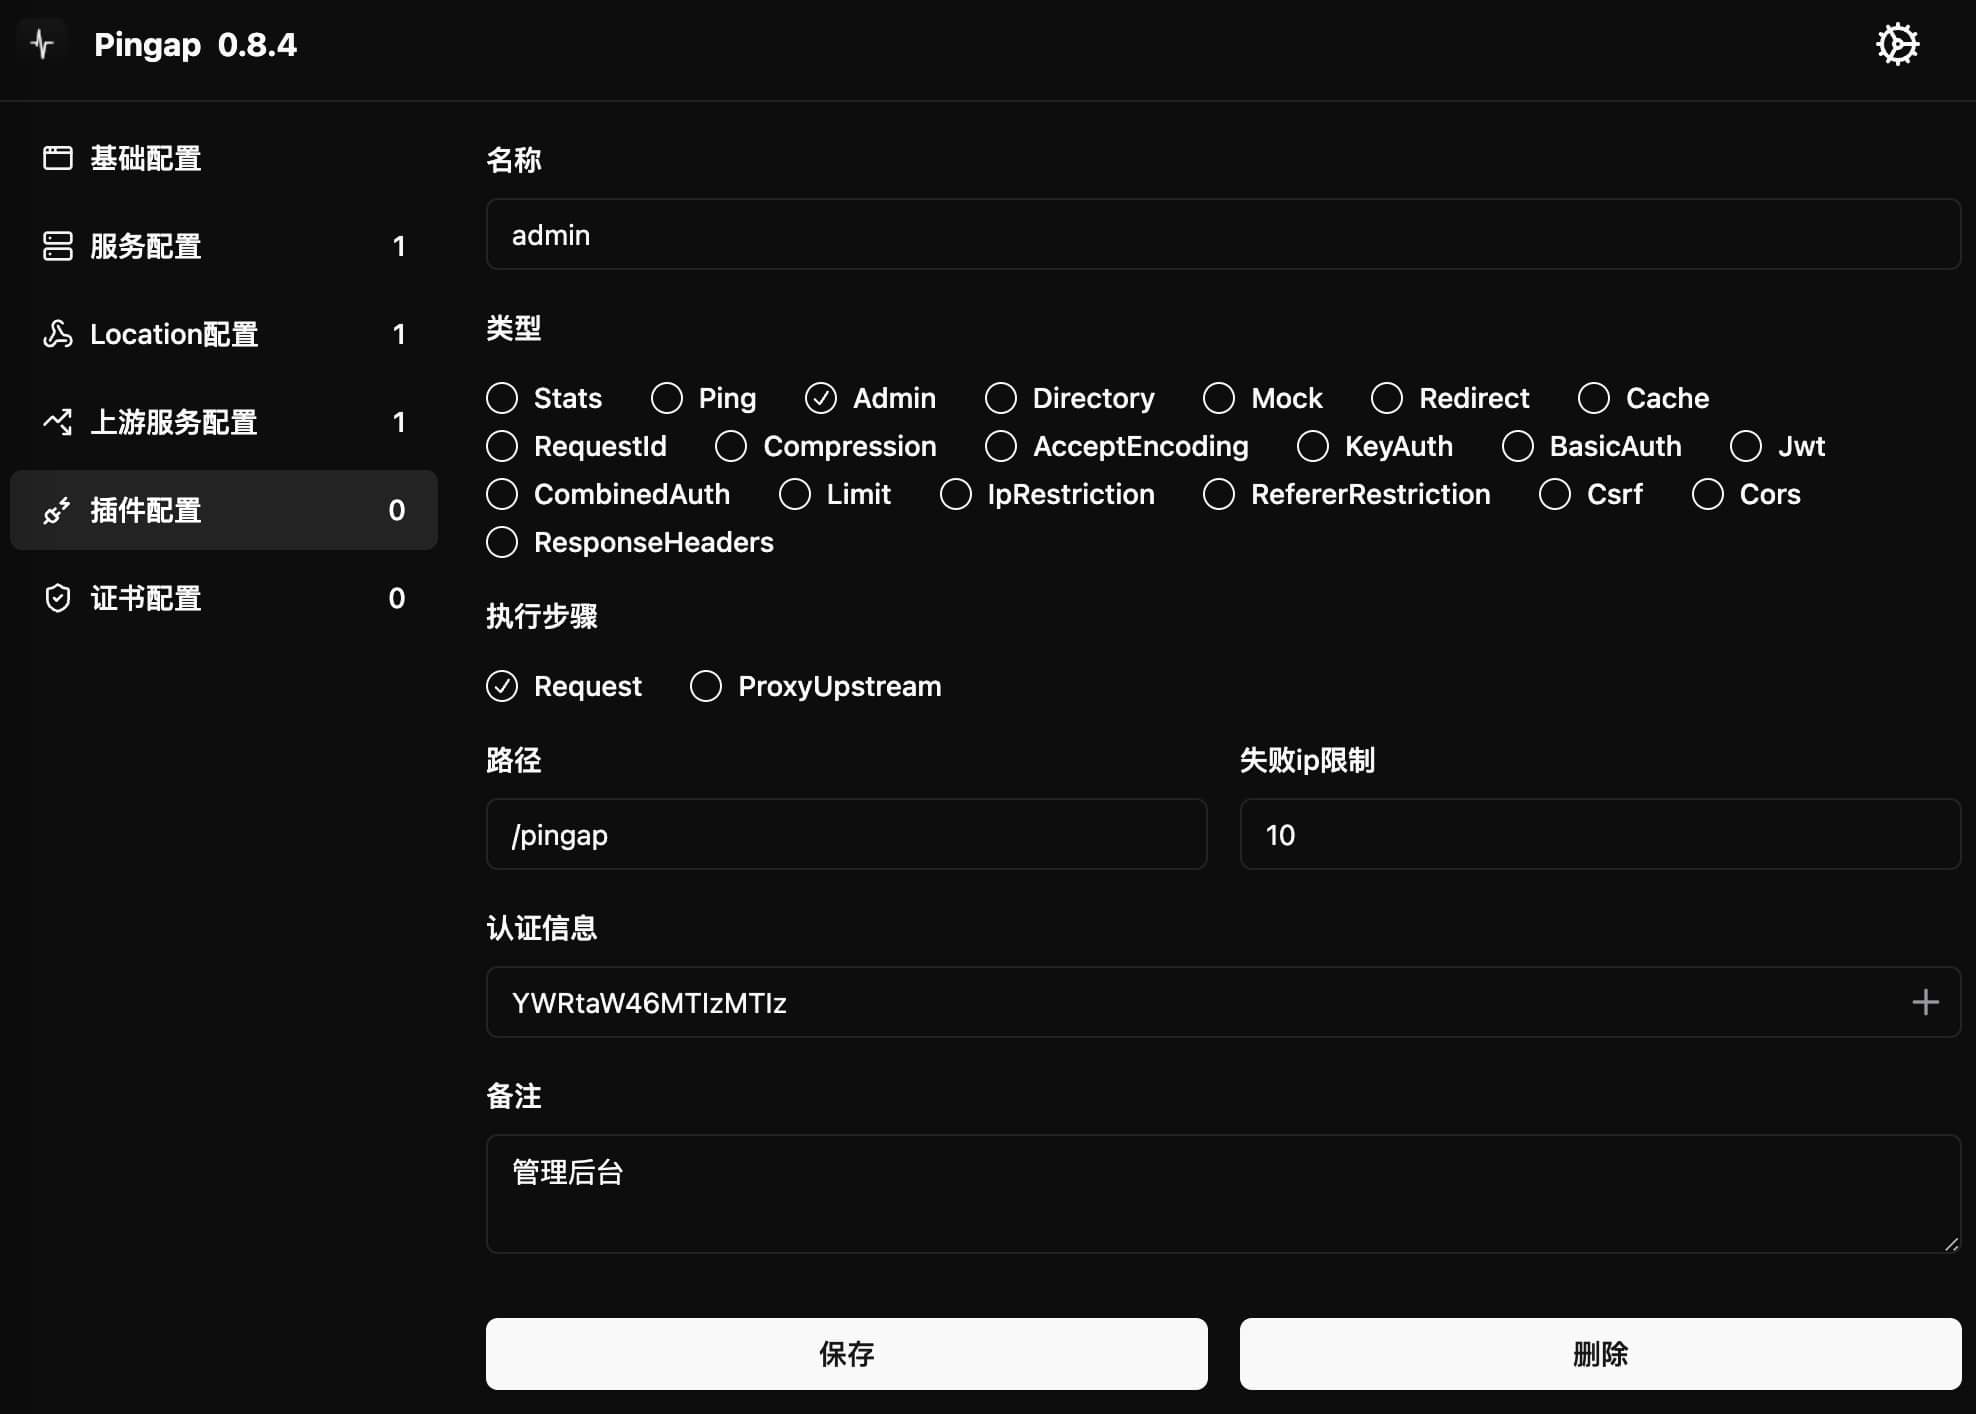
Admin 插件用于为现有 location 添加管理后台功能。配置示例:
[plugins.admin]
authorizations = ["YWRtaW46MTIzMTIz"] # base64(admin:123123)
category = "admin"
ip_fail_limit = 10
max_age = "7d"
path = "/pingap"
remark = "管理后台"
配置参数
authorizations: Basic 认证的密钥列表,使用 base64 编码的用户名:密码格式ip_fail_limit: 单个 IP 允许的最大认证失败次数path: 管理后台访问路径max_age: 登录会话有效期,默认为 2 天step: 插件执行时机,可选request或proxy_upstream
使用方式
- 将插件配置关联到指定 location
- 访问该 location 下的配置路径(如
/pingap/)即可进入管理后台 - 使用配置的账号密码登录(示例中为
admin/123123)
Directory
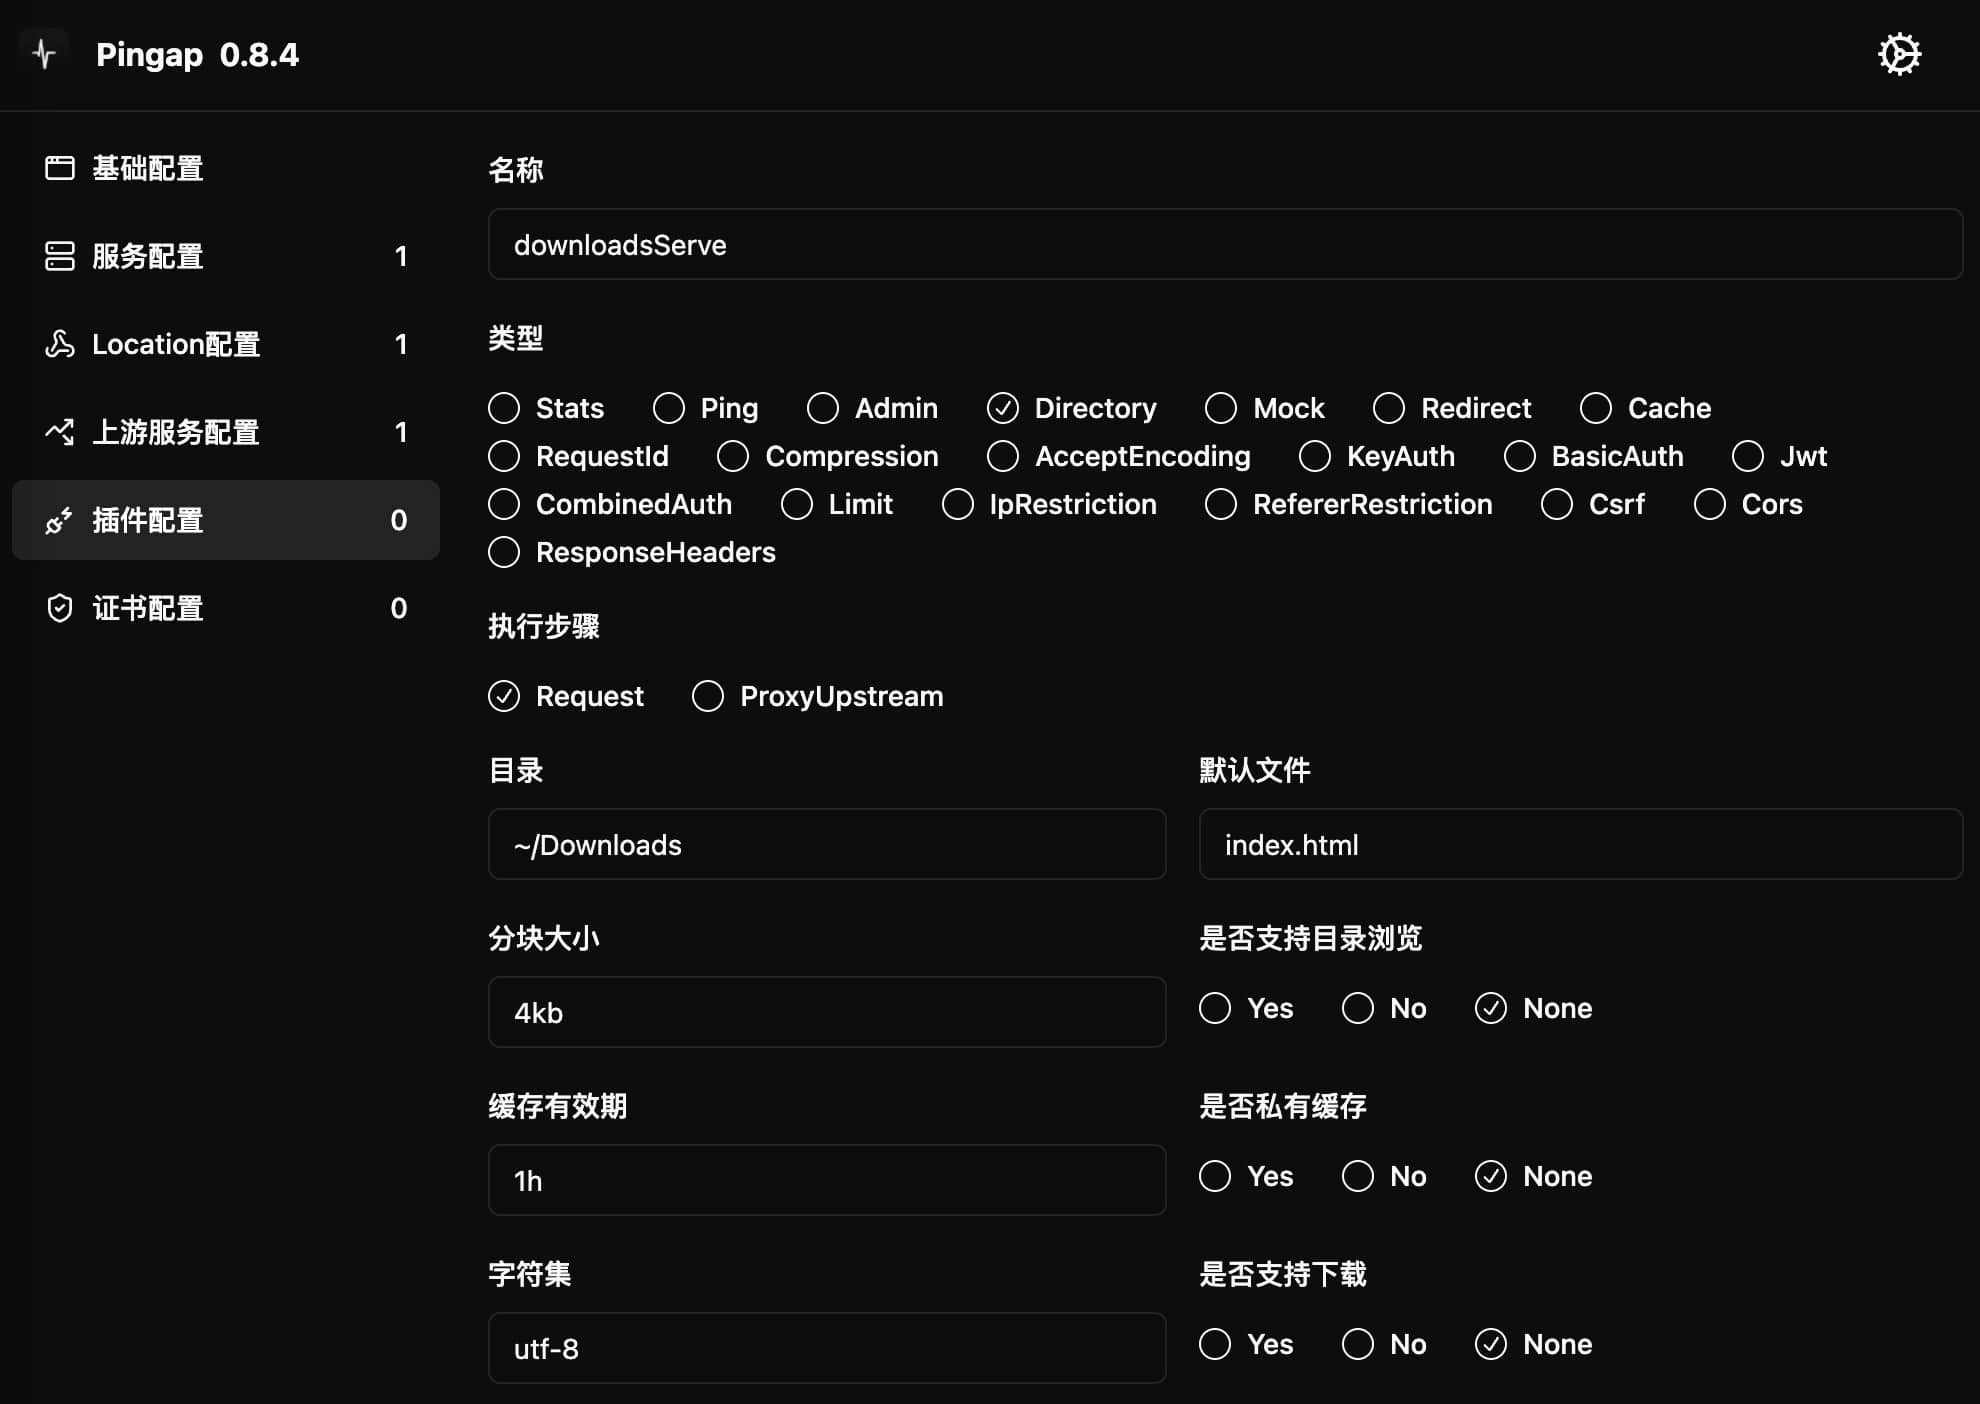
Directory 插件提供静态文件服务功能,支持文件浏览和下载。
配置示例
[plugins.downloadsServe]
category = "directory"
path = "~/Downloads"
chunk_size = "4kb"
max_age = "1h"
private = true
index = "index.html"
charset = "utf-8"
autoindex = true
download = true
headers = [
    "X-Server:pingap",
]
配置参数
path: 静态文件目录路径chunk_size: HTTP 分块传输大小,默认8kbmax_age: HTTP 缓存时间- 默认不设置缓存
- 对
text/html类型始终禁用缓存 - 如
1h表示缓存 1 小时
private: 是否将缓存设为private(默认为public)index: 默认索引文件名,默认为index.htmlcharset: 指定字符集编码,默认不设置autoindex: 是否启用目录浏览- 启用后
index参数将失效
- 启用后
download: 是否启用文件下载- 启用后将设置
Content-Disposition响应头
- 启用后将设置
headers: 自定义 HTTP 响应头列表step: 插件执行时机,可选request或proxy_upstream,若设置为proxy_upstream并添加相应的缓存插件,可大幅度提供性能
使用方式
在界面中配置静态文件目录路径,根据需要调整其他参数:
Mock
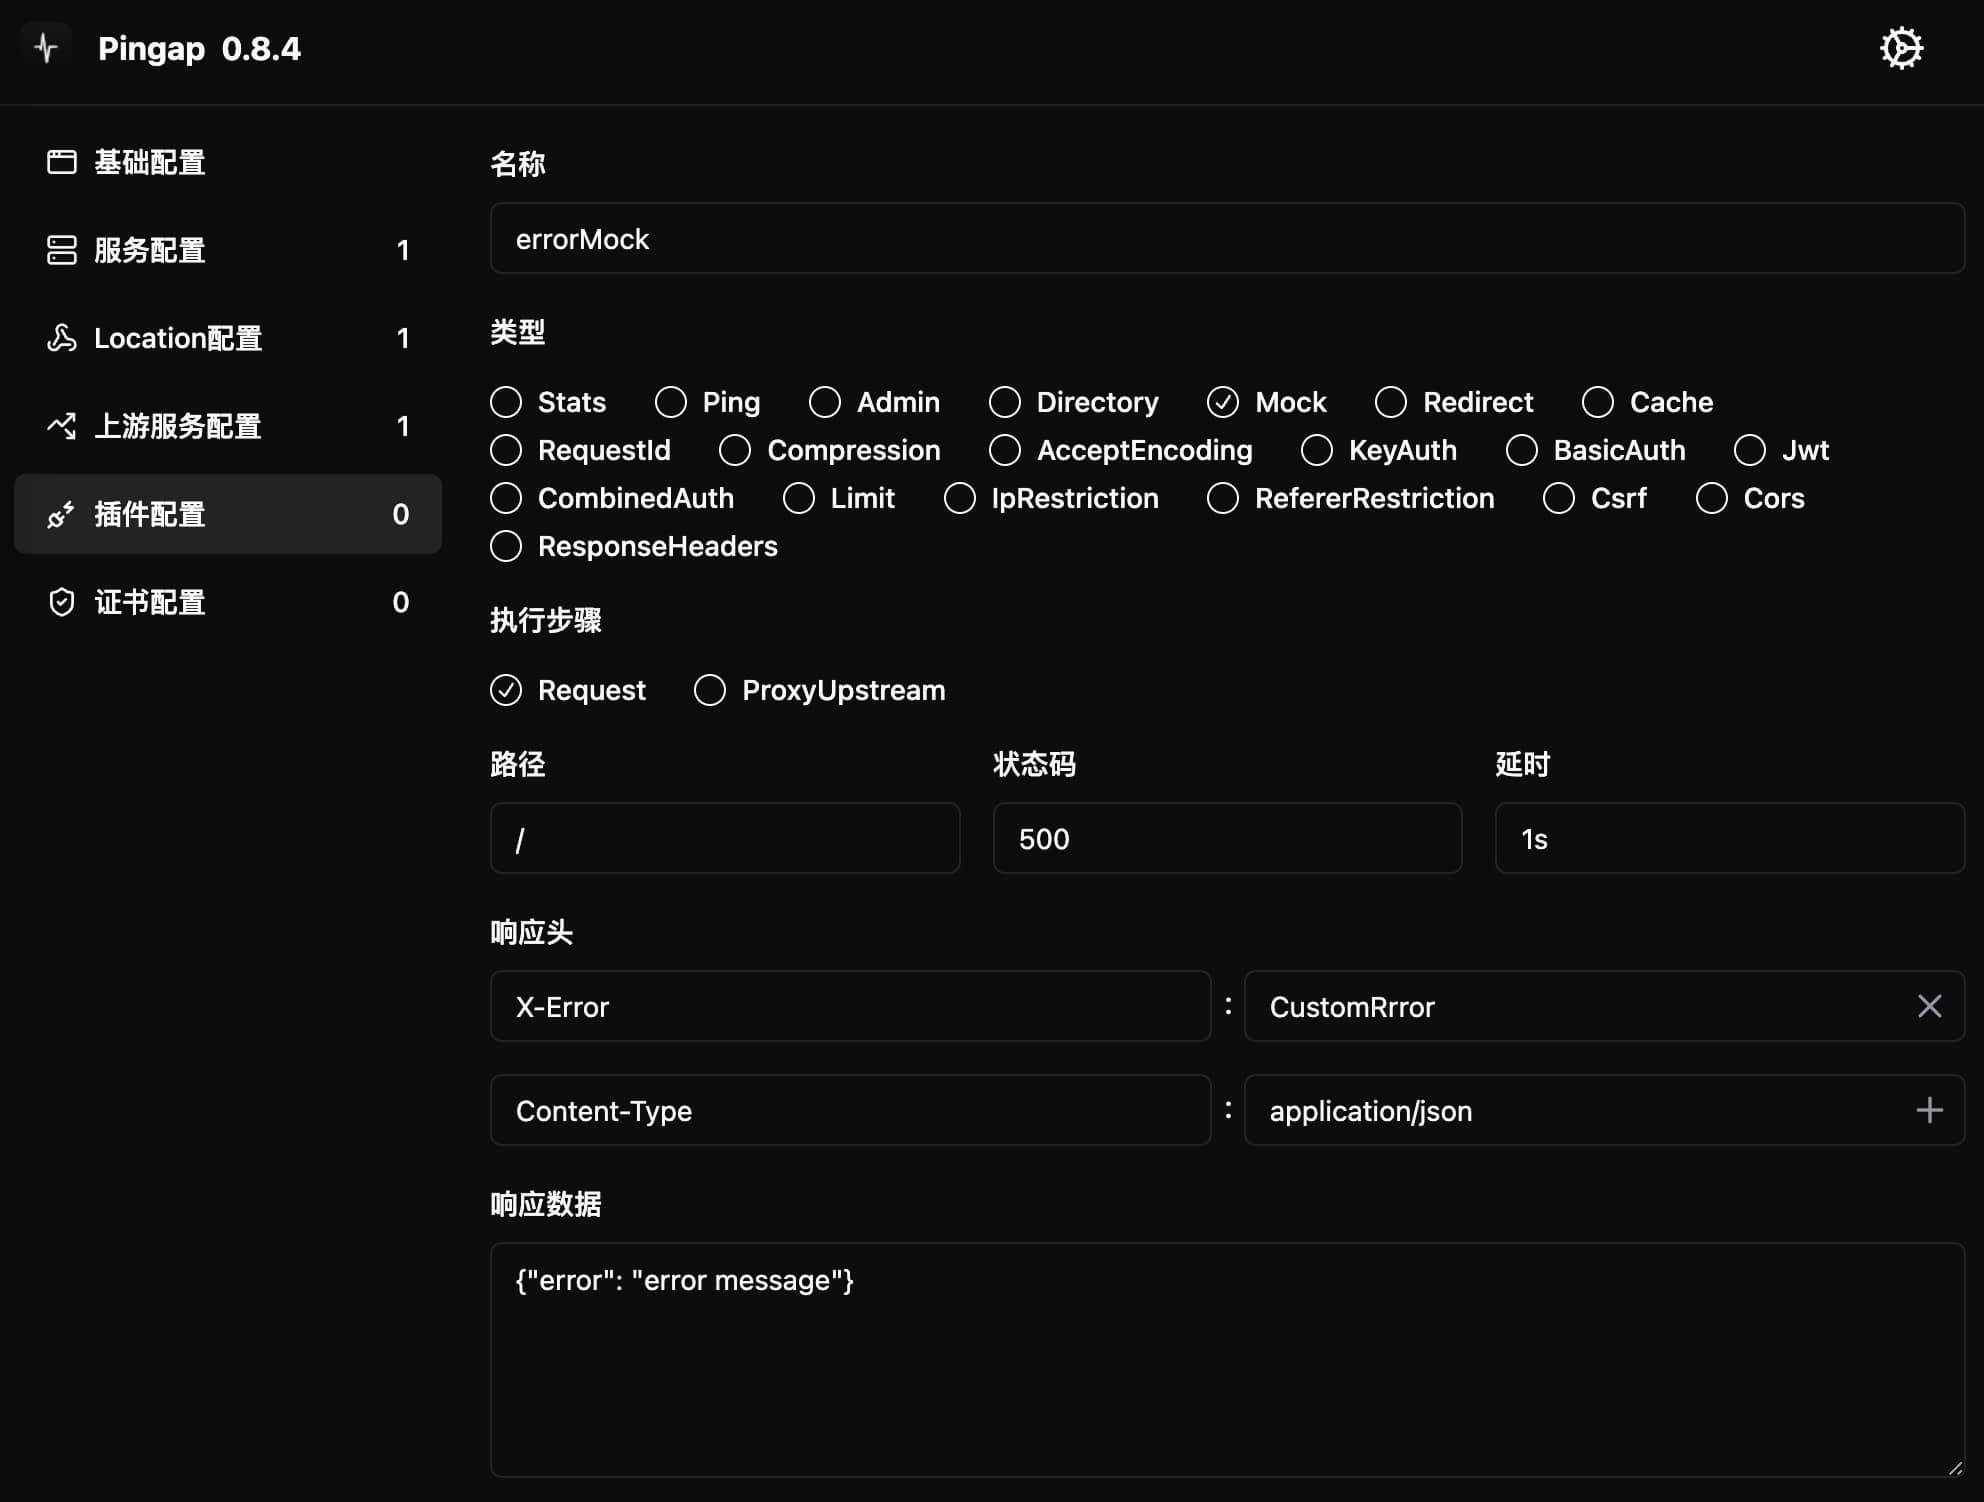
Mock 插件用于模拟 HTTP 响应,可用于测试或临时服务降级。支持自定义响应内容、状态码和响应头,访插件固定执行在request阶段。
配置示例
[plugins.errorMock]
category = "mock"
data = '{"error": "error message"}'
delay = "1s"
headers = [
    "X-Error:CustomRrror",
    "Content-Type:application/json",
]
path = "/"
status = 500
配置参数
data: 模拟的响应数据- 对于不同类型的数据,需在
headers中指定对应的Content-Type
- 对于不同类型的数据,需在
headers: 自定义响应头列表path: 需要模拟响应的请求路径- 不配置则匹配所有路径
status: HTTP 响应状态码delay: 响应延迟时间
使用方式
在界面中配置响应数据和相关参数,注意根据响应数据类型设置正确的 Content-Type:
Redirect
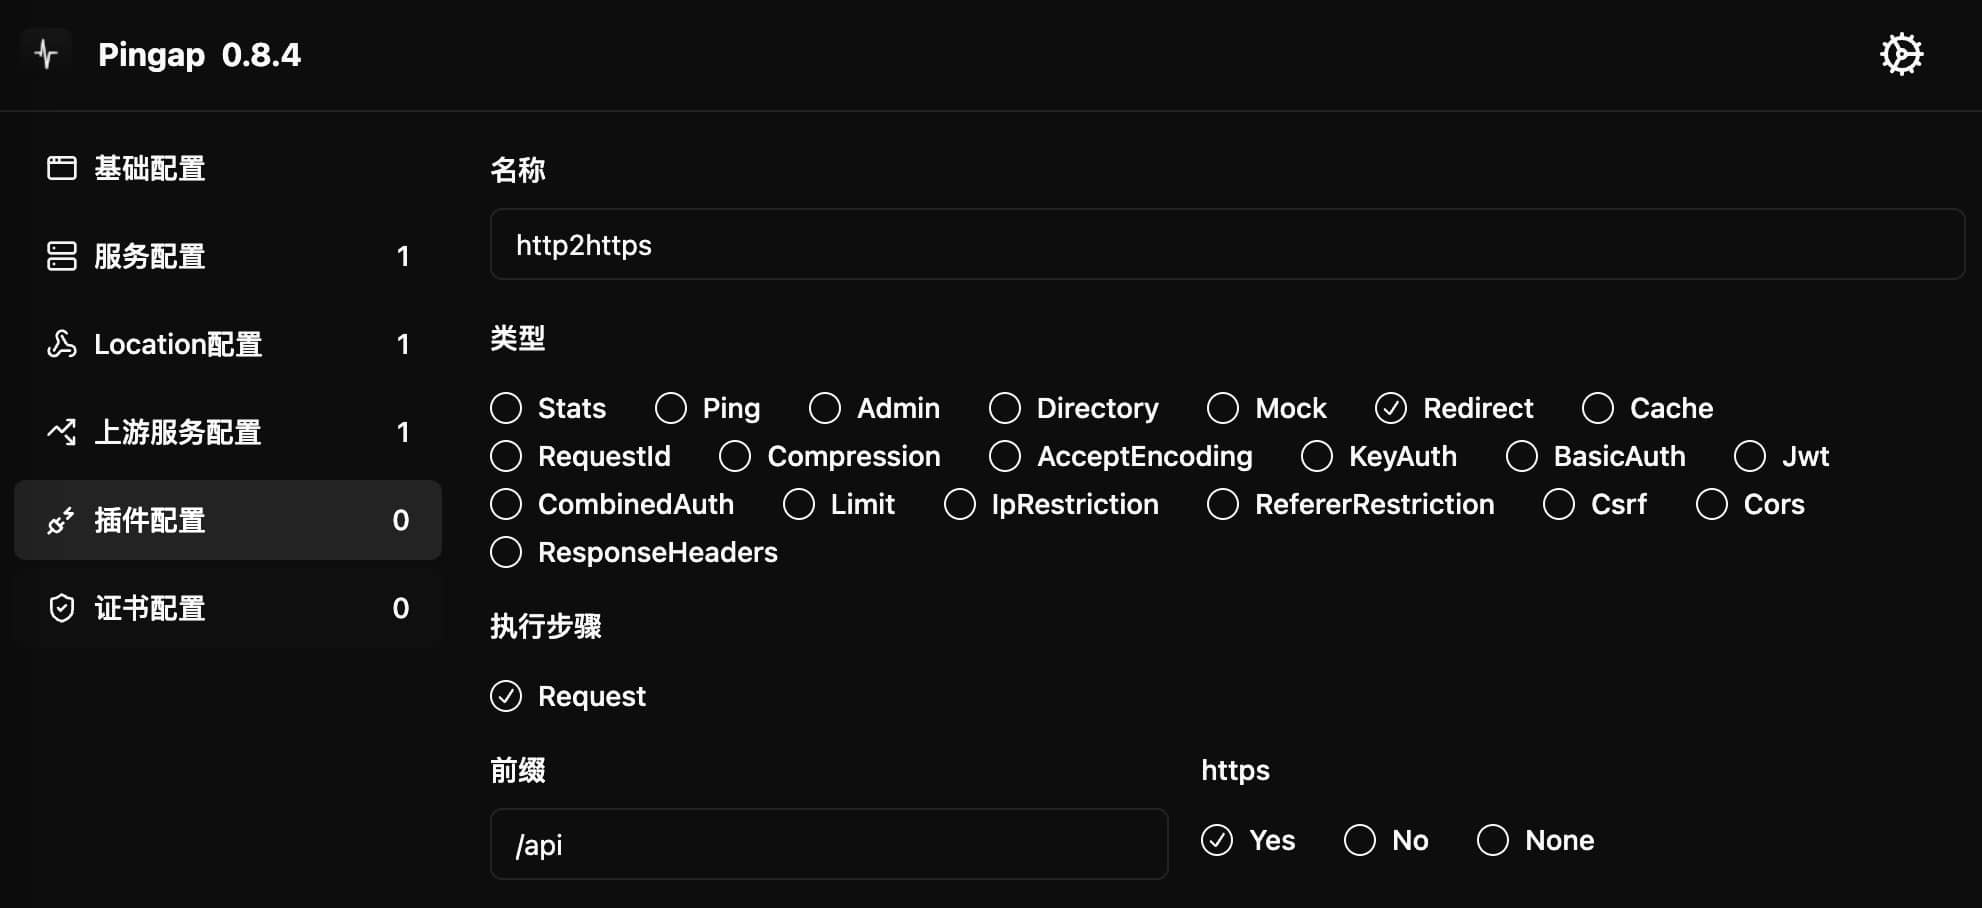
Redirect 插件用于 HTTP 请求重定向,支持添加 URL 前缀或将 HTTP 请求重定向至 HTTPS,访插件固定执行在request阶段。
配置示例
[plugins.http2https]
category = "redirect"
http_to_https = true
prefix = "/api"
配置参数
http_to_https: 是否将 HTTP 请求重定向至 HTTPSprefix: 重定向时要添加的 URL 前缀step: 插件执行时机,仅支持request
使用方式
在界面中配置重定向参数:
- 启用 HTTPS 重定向:勾选
http_to_https - 添加 URL 前缀:在
prefix字段中填写(可选)
Cache
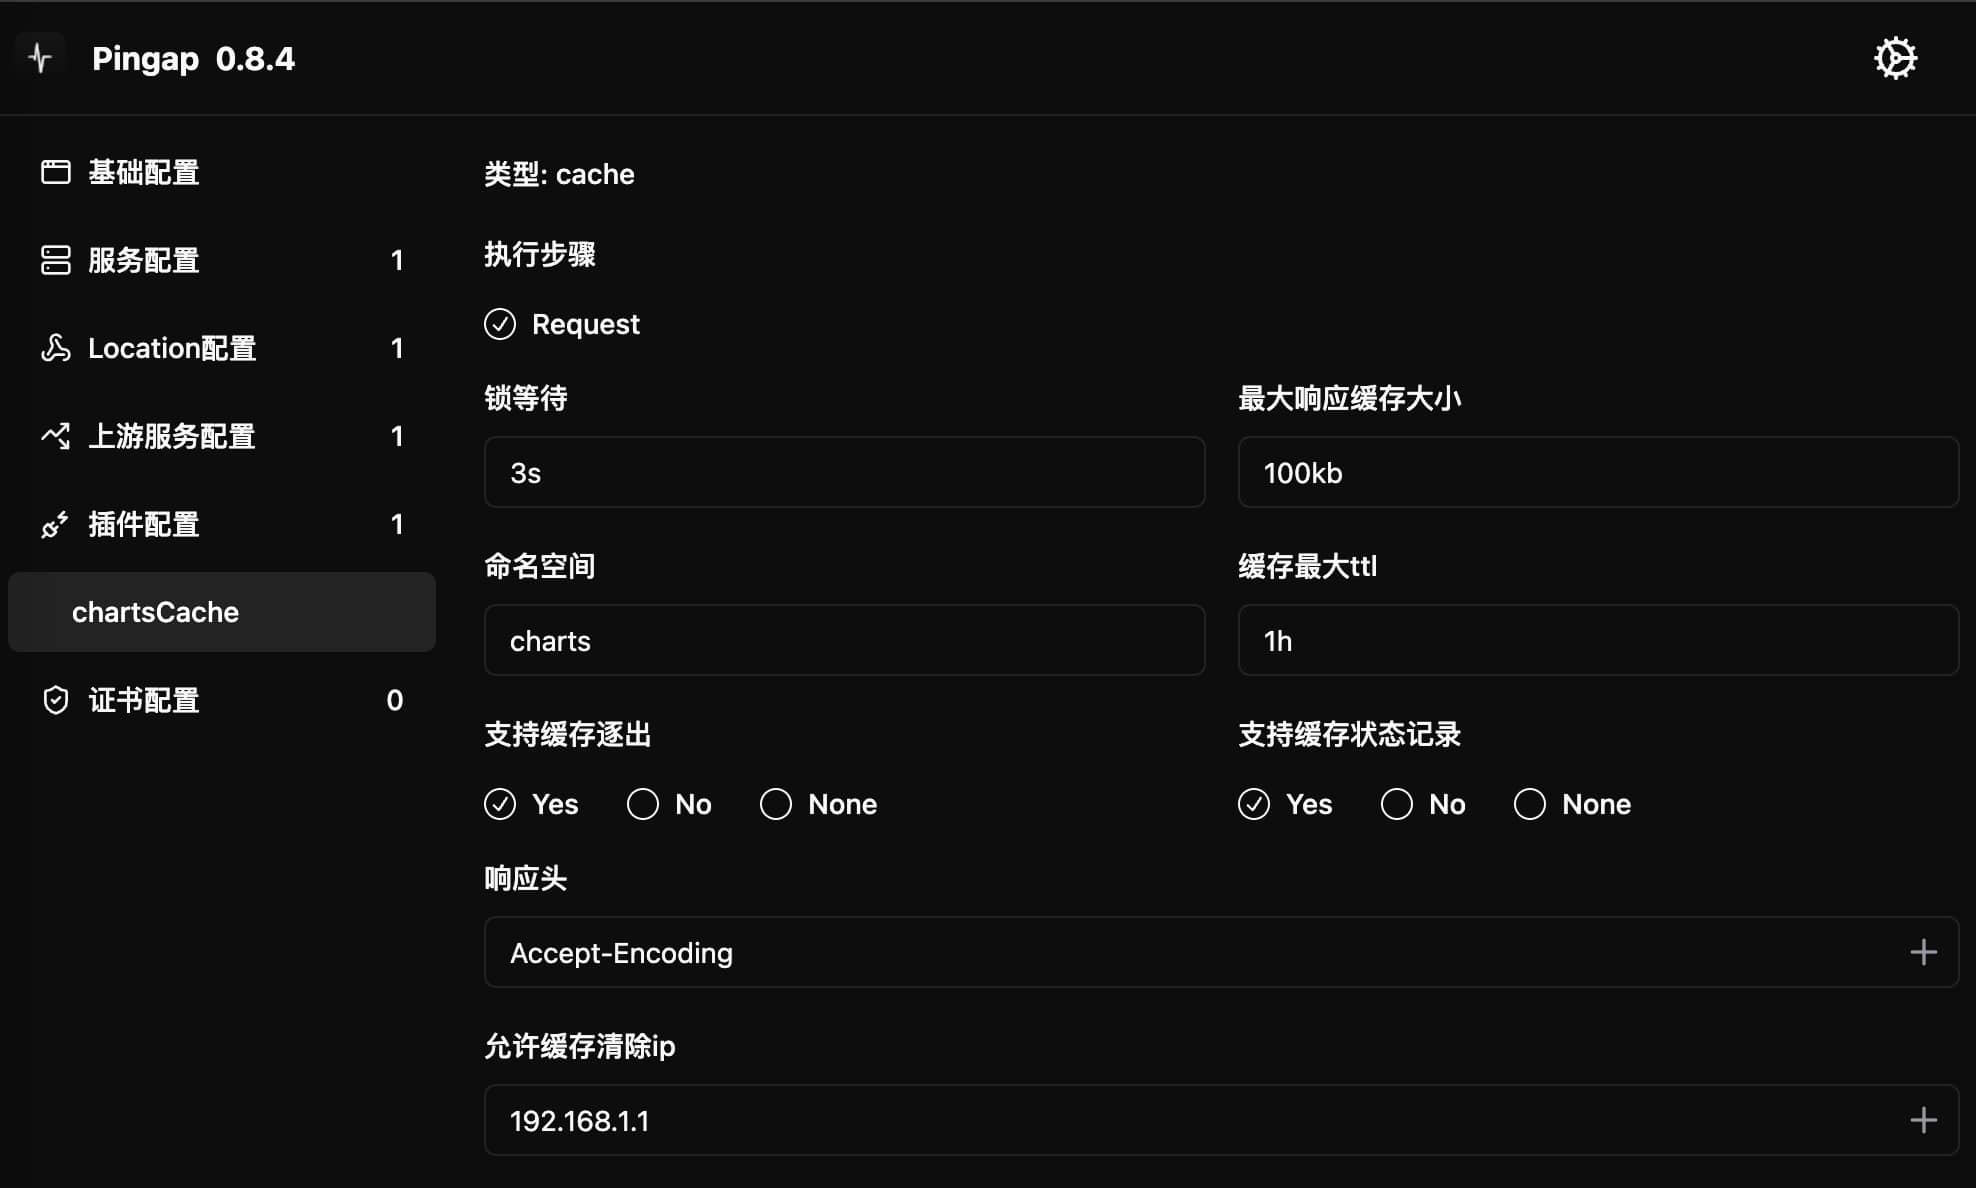
缓存中间件,用于缓存 HTTP 请求。由于缓存暂时仅支持全局初始化,为避免相同 URL 的冲突,建议每个 location 使用不同的插件设置不同的 namespace,该插件固定在request阶段执行。
配置示例
[plugins.chartsCache]
category = "cache"
eviction = true
headers = ["Accept-Encoding"]
lock = "3s"
max_file_size = "100kb"
max_ttl = "1h"
namespace = "charts"
predictor = true
purge_ip_list = [
    "127.0.0.1",
    "192.168.1.1/24"
]
check_cache_control = false
配置参数
lock: 缓存不存在请求转发至upstream等待时,相同请求的等待时长,默认为 1 秒- 用于避免缓存击穿
max_file_size: 单个缓存文件的最大长度,默认为 1MB- 建议设置合理的值,避免过大的响应占用过多内存
namespace: 缓存命名空间- 缓存键基于 namespace + path + querystring 生成
- 多域名场景建议使用不同的命名空间
- 文件缓存时对应单独的文件目录
max_ttl: 缓存的最长有效期- 当上游响应的
Cache-Control的max-age较长时,建议设置较短的s-maxage - 当上游未设置
s-maxage时,可通过此配置限制缓存时间
- 当上游响应的
eviction: 是否启用缓存清除机制- 当缓存超限时触发清除
- 文件缓存会自动清除长期未访问的缓存,可不设置
predictor: 是否记录无法缓存的请求- 避免重复判断请求是否可缓存
headers: 作为缓存键一部分的请求头列表- 当响应的缓存依赖特定请求头时配置
- 例如:上游支持不同压缩算法时,需包含
Accept-Encoding
purge_ip_list: 允许执行 purge 请求的 IP 列表,默认为空skip: 跳过缓存的正则表达式,请求url匹配则跳过缓存插件,默认为空- 用于快速跳过某些请求的缓存判断
check_cache_control: 校验cache-control响应头,若无均认为不可缓存
界面配置
RequestId
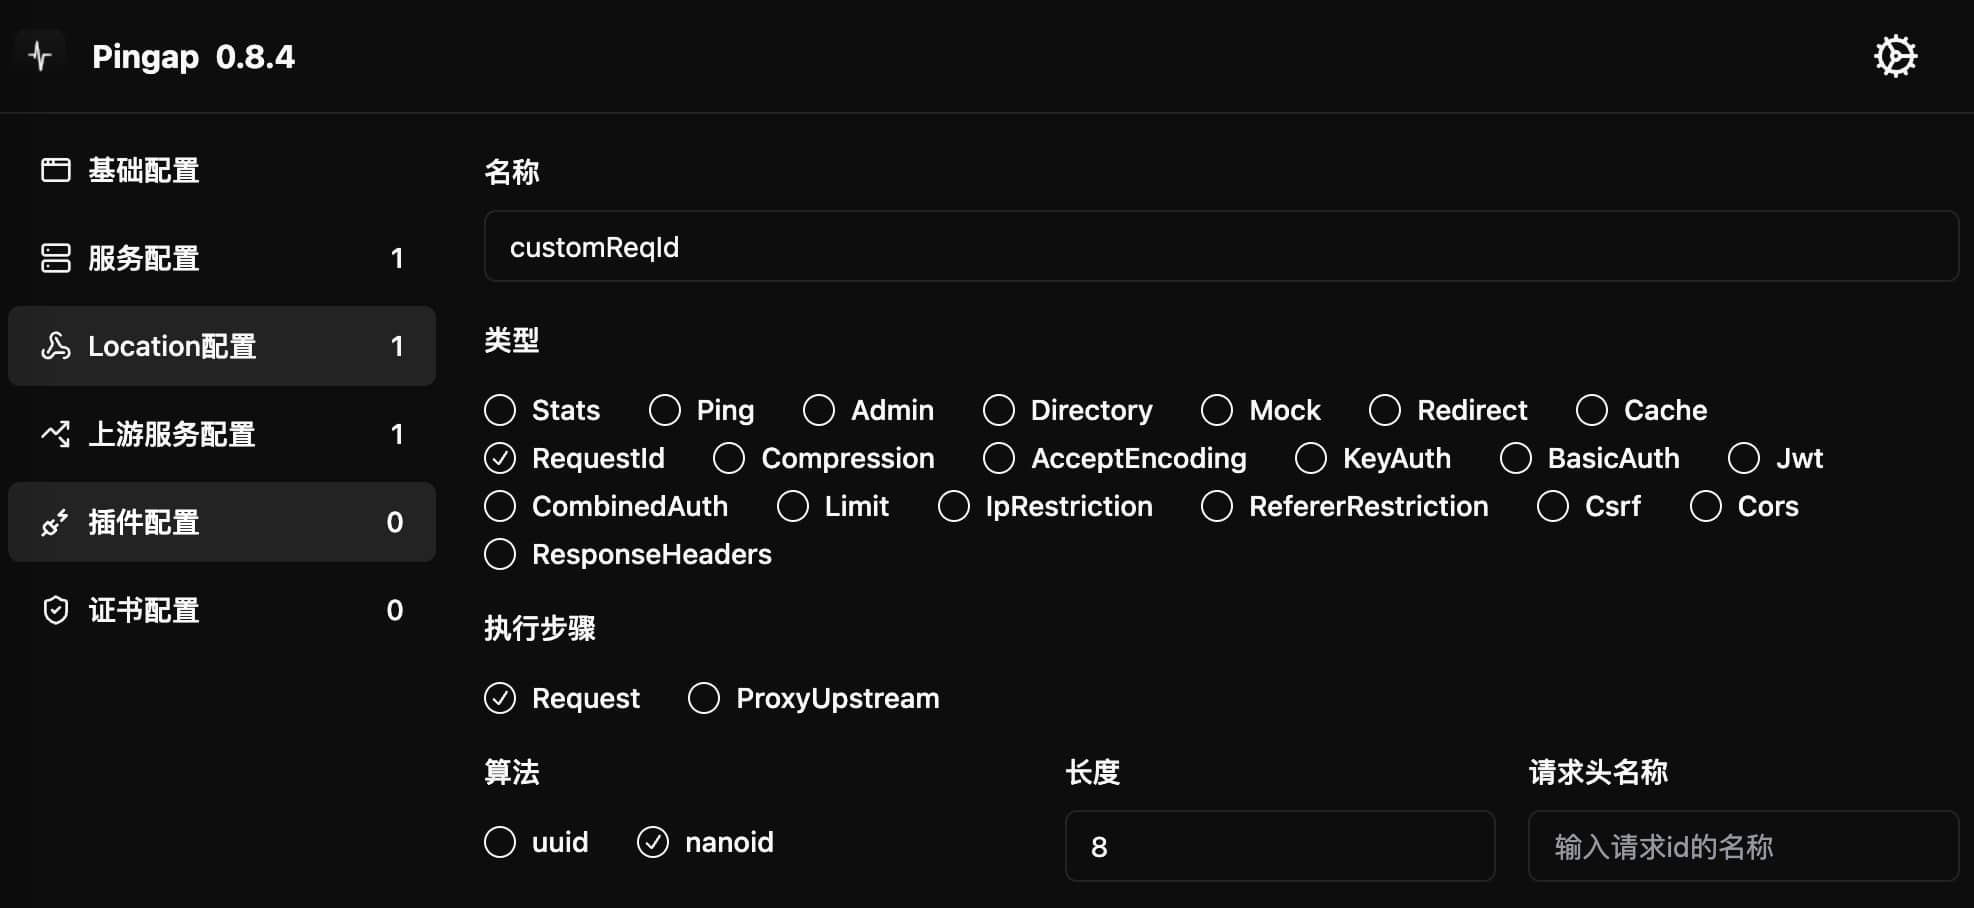
为每个请求添加唯一标识符。默认添加到 X-Request-Id 请求头中(可自定义请求头名称)。如果请求中已存在该请求头,则保留原值不做修改。
配置示例
[plugins.customReqId]
algorithm = "nanoid"  # 可选: uuid 或 nanoid
category = "request_id"
size = 8              # nanoid 长度,仅在 algorithm=nanoid 时有效
header = "X-Request-Id"  # 可选:自定义请求头名称
step = "request"      # 可选: request 或 proxy_upstream
配置参数
algorithm: 生成请求 ID 的算法uuid: 使用 UUID v4 格式nanoid: 使用 NanoID 格式(更短、URL 安全)
size: NanoID 长度,仅当 algorithm=nanoid 时有效header: 自定义请求头名称,默认为X-Request-Idstep: 插件执行时机,可选request或proxy_upstream
使用场景
- 请求追踪:方便在分布式系统中追踪请求链路
- 日志关联:通过请求 ID 关联不同服务的日志
- 问题排查:使用请求 ID 快速定位问题
Compression
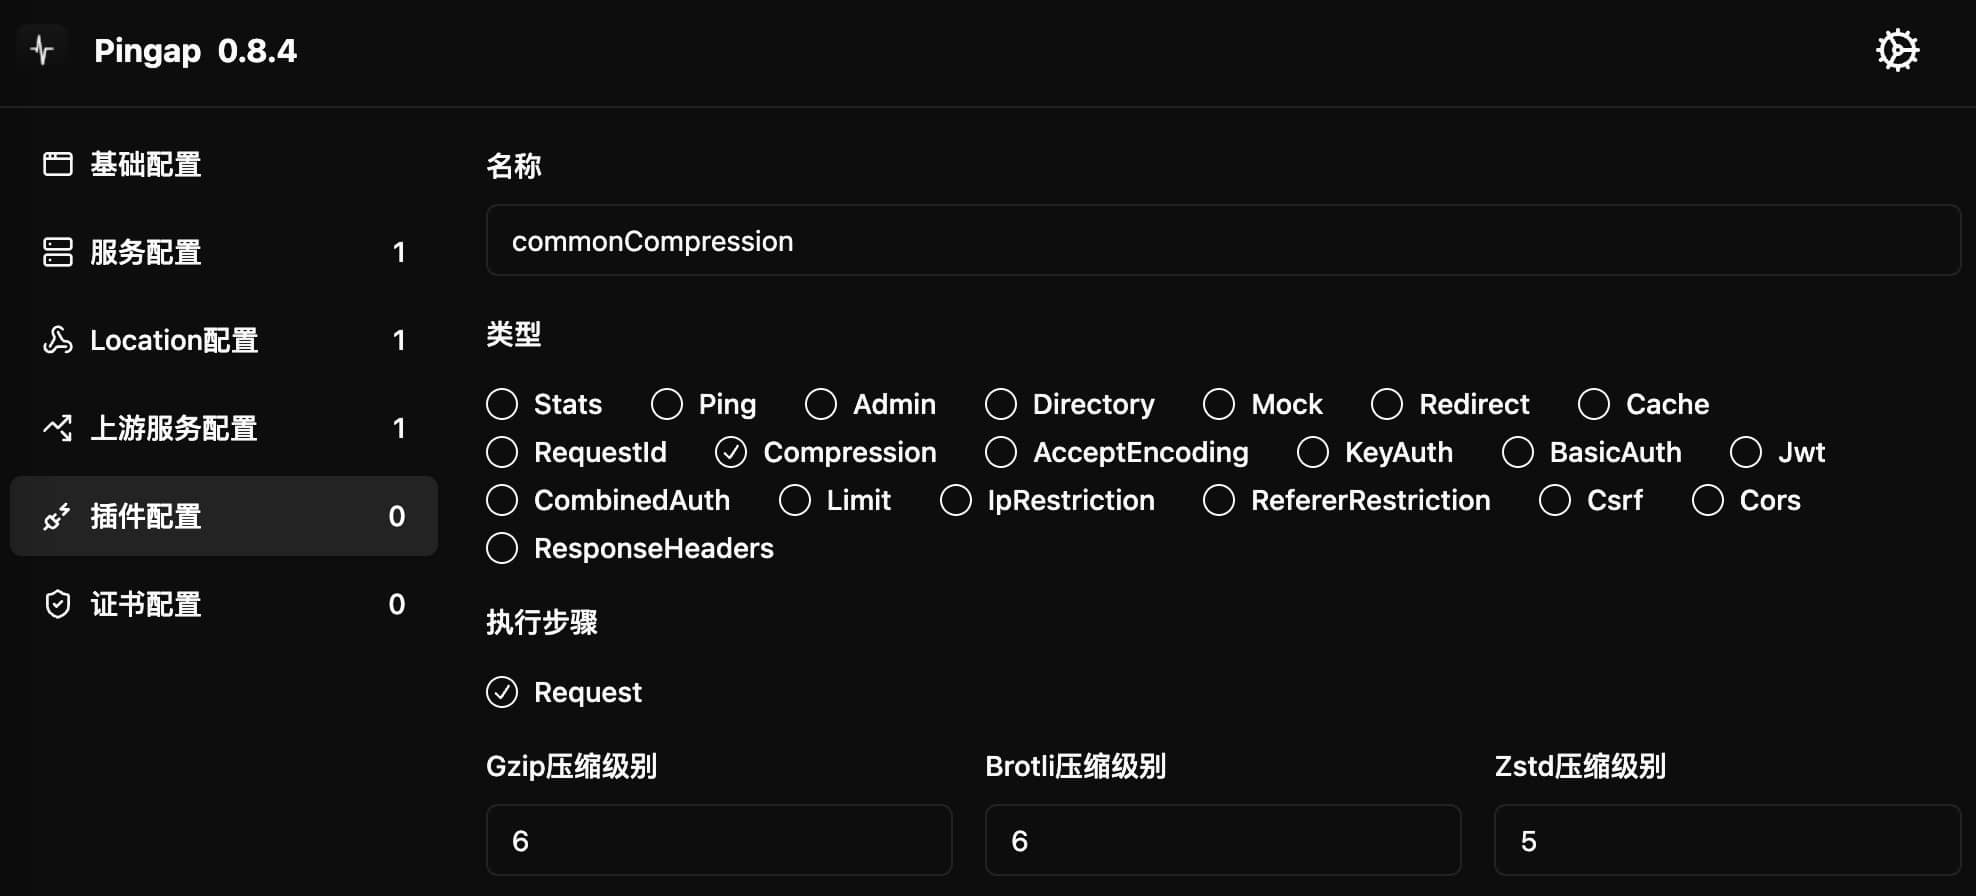
HTTP 响应压缩插件,用于处理上游返回数据的压缩。支持 gzip、brotli(br) 和 zstd 三种压缩算法。
工作原理
由于 Pingora 默认的压缩算法匹配顺序为 gzip --> br --> zstd,而现代浏览器对这些算法的支持情况为:
- gzip: 基本全部支持
- br(brotli): 大部分支持
- zstd: 部分支持
为了优化压缩效果,pingap会根据配置以及浏览器支持的压缩算法,按zstd --> br --> gzip的规则设置,只设置一个压缩算法。
配置示例
[plugins.commonCompression]
category = "compression"
br_level = 6      # brotli 压缩级别 (0-11)
gzip_level = 6    # gzip 压缩级别 (0-9)
zstd_level = 5    # zstd 压缩级别 (0-22)
decompression = true
配置参数
br_level: brotli 压缩级别,范围 0-11,0 表示禁用gzip_level: gzip 压缩级别,范围 0-9,0 表示禁用zstd_level: zstd 压缩级别,范围 0-22,0 表示禁用decompression: 是否解�压上游返回的压缩数据
内置配置
可以使用内置的 pingap:compression 插件,其默认配置为:
- gzip_level = 6
- br_level = 6
- zstd_level = 3
执行阶段
插件固定在 early_request 阶段执行,无需手动指定。
AcceptEncoding
用于管理和优化 HTTP 请求的 Accept-Encoding 头,允许自定义支持的压缩算法及其优先顺序,顺序建议为zdt > br > gzip。
配置示例
[plugins.acceptEncoding]
category = "accept_encoding"
encodings = "zstd, br, gzip"    # 支持的编码及优先顺序
only_one_encoding = true        # 是否仅使用单一编码
配置参数
encodings: 指定支持的压缩算法及其优先顺序- 多个算法用逗号分隔
- 顺序从左到右表示优先级从高到低
- 支持的算法: zstd、br、gzip
only_one_encoding: 是否仅保留一种编码方式true: 仅使用优先级最高的支持的编码false: 保留所有支持的编码,按优先级排序
执行阶段
插件固定在 early_request 阶段执行,无需手动指定。
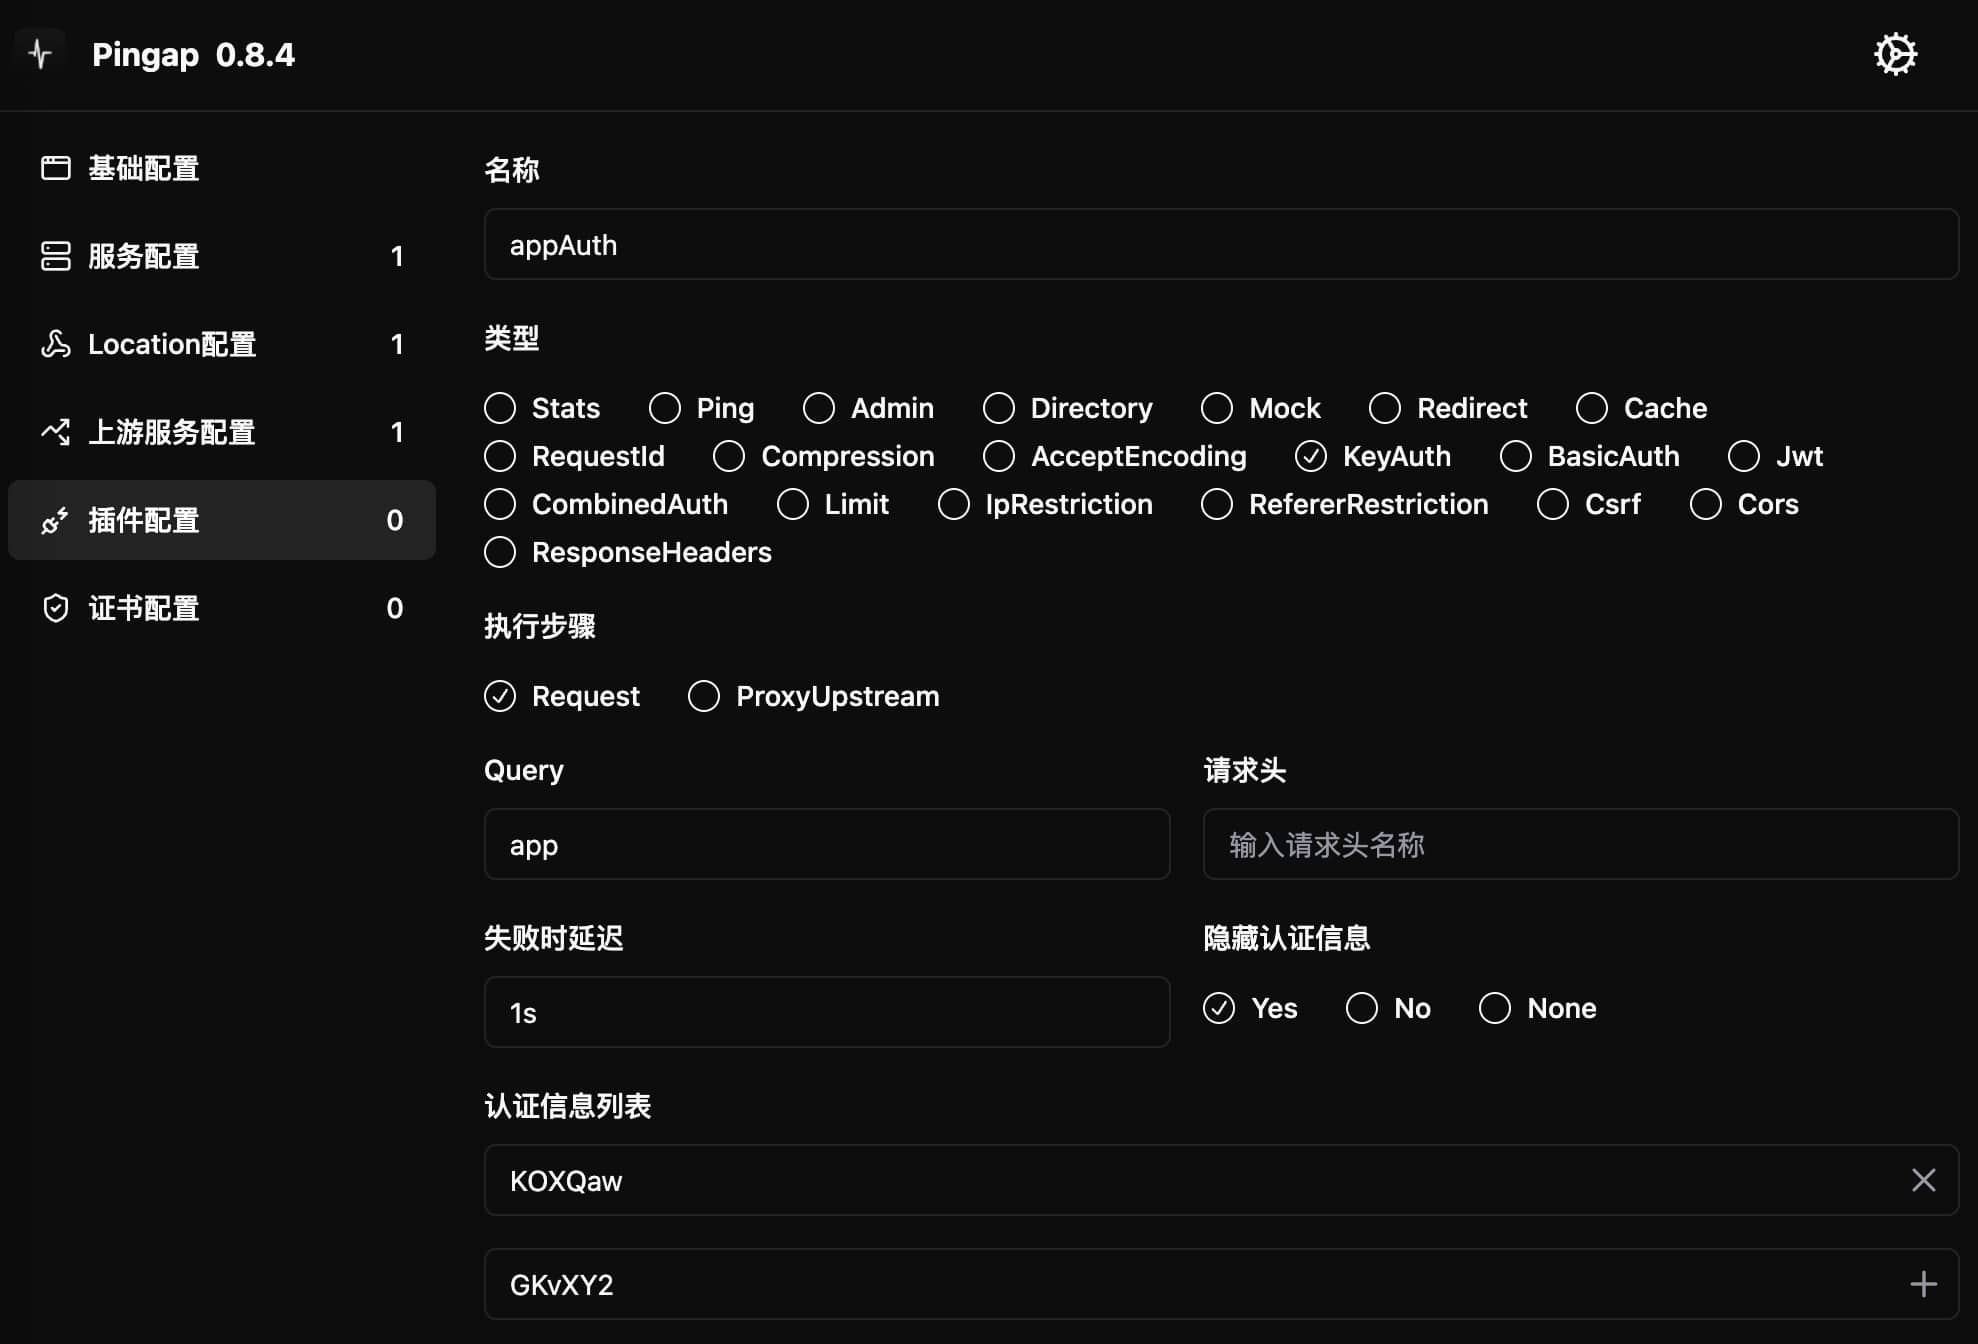
KeyAuth
提供简单的 API 密钥认证机制,支持从请求参数(query)或请求头(header)中获取认证信息。可配置多个有效密钥,方便多系统接入,访插件固定执行在request阶段。
配置示例
从请求参数获取认证信息
[plugins.queryAuth]
category = "key_auth"
query = "app"           # 从 URL 参数 app 中获取密钥
keys = [               # 允许的密钥列表
    "KOXQaw",
    "GKvXY2",
]
delay = "1s"
hide_credentials = true
从请求头获取认证信息
[plugins.headerAuth]
category = "key_auth"
header = "X-App"        # 从请求头 X-App 中获取密钥
keys = [               # 允许的密钥列表
    "KOXQaw",
    "GKvXY2",
]
delay = "1s"
hide_credentials = true
配置参数
query: 从请求参数中获取密钥的参数名header: 从请求头中获取密钥的头部名称query和header二选一,同时配置时优先使用query
keys: 允许的密钥列表delay: 认证失败时的响应延迟时间hide_credentials: 是否在转发请求时移除认证信息
界面配置
配置密钥获取方式(��请求参数或请求头)及对应的有效密钥列表:
BasicAuth
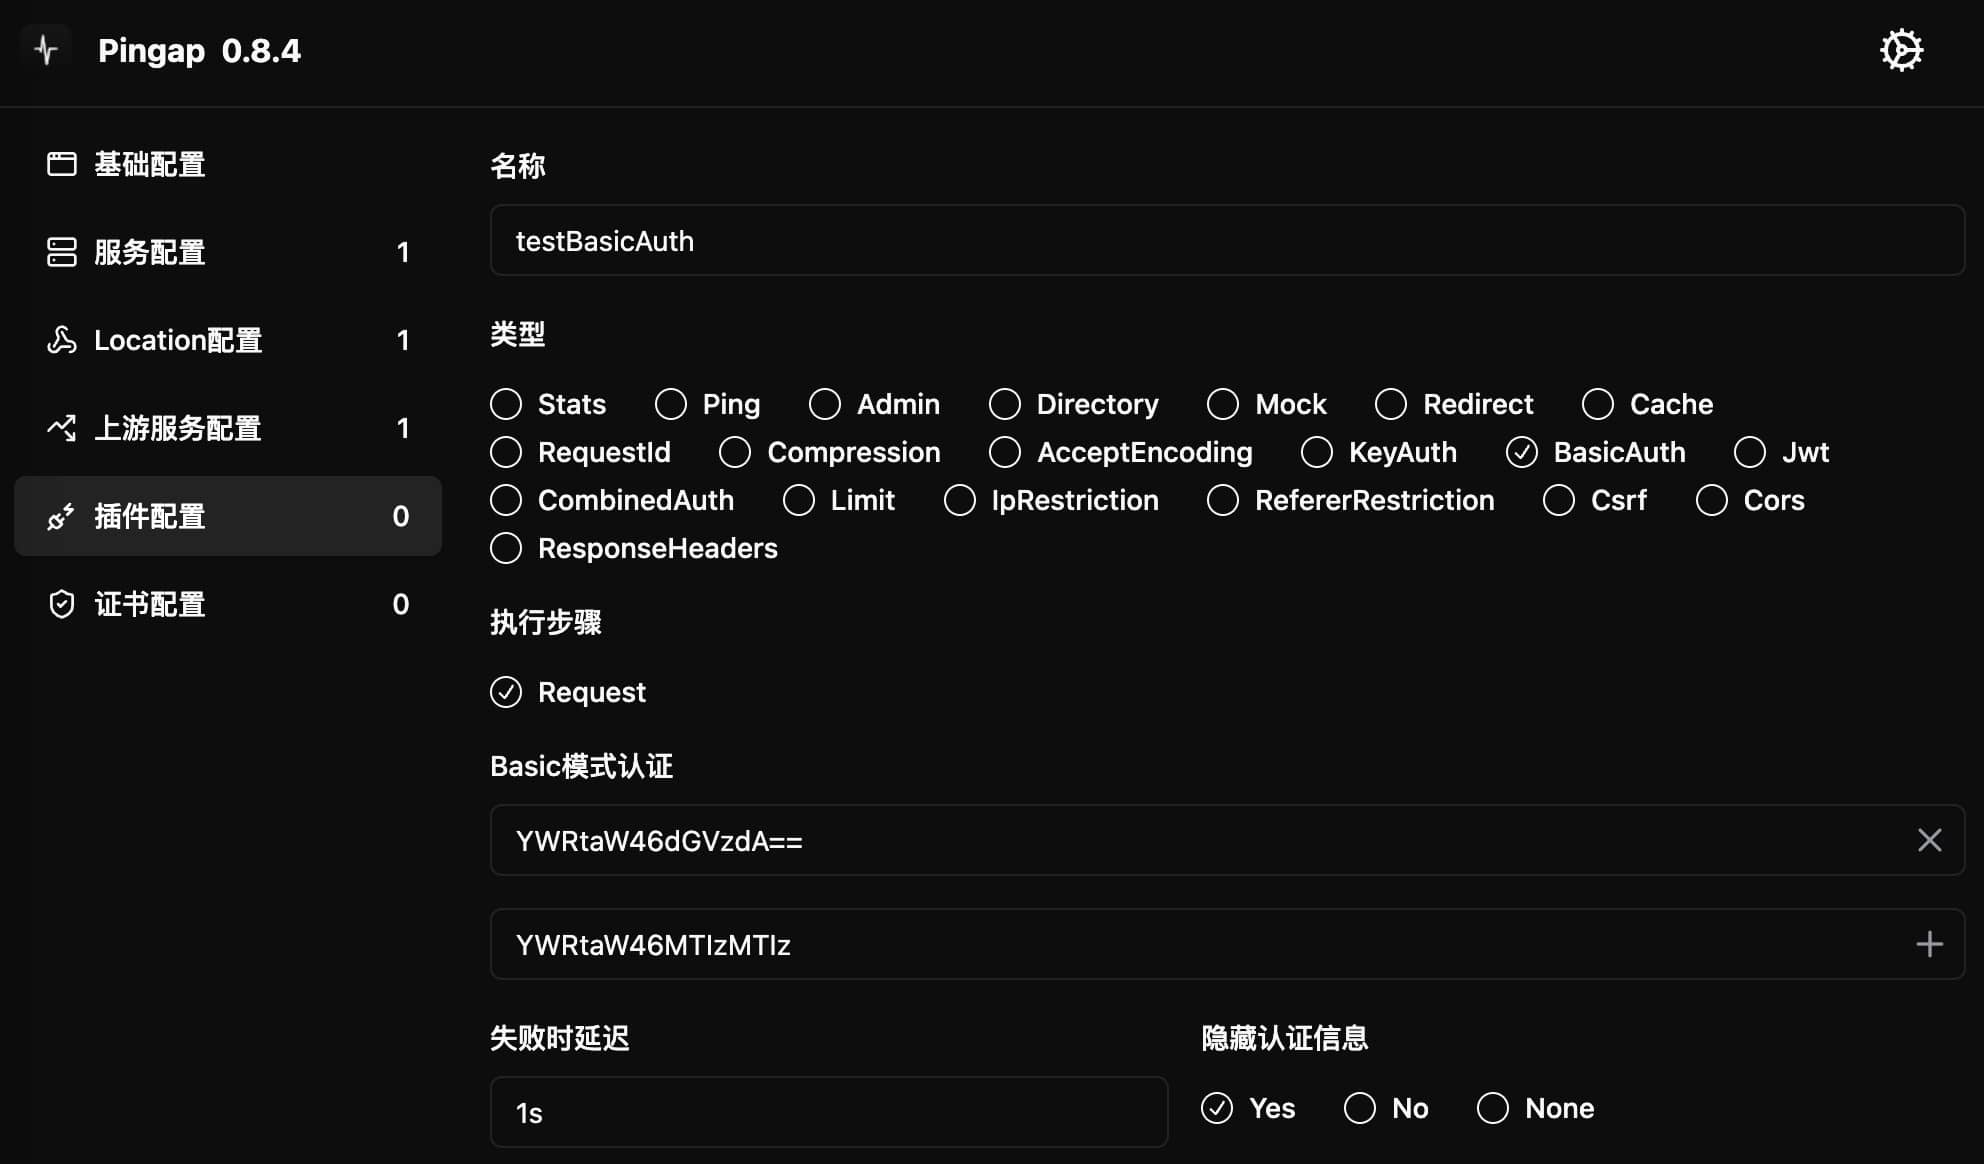
提供 HTTP Basic Authentication 认证功能。支持配置多组用户名/密码对,需以 base64 编码格式配置,该插件固定在request阶段执行。
配置示例
[plugins.testBasicAuth]
authorizations = [
    "YWRtaW46dGVzdA==",    # admin:test
    "YWRtaW46MTIzMTIz",    # admin:123123
]
category = "basic_auth"
delay = "1s"
hide_credentials = true
配置参数
authorizations: 认证凭据列表- 格式为
base64(username:password) - 可配置多组凭据
- 格式为
delay: 认证失败时的响应延迟时间hide_credentials: 是否在转发请求时移除认证信息
使用说明
- 将用户名和密码按
username:password格式拼接 - 对拼接结果进行 base64 编码
- 将编码后的字符串添加到
authorizations列表中
例如:
admin:test->YWRtaW46dGVzdA==admin:123123->YWRtaW46MTIzMTIz
JWT
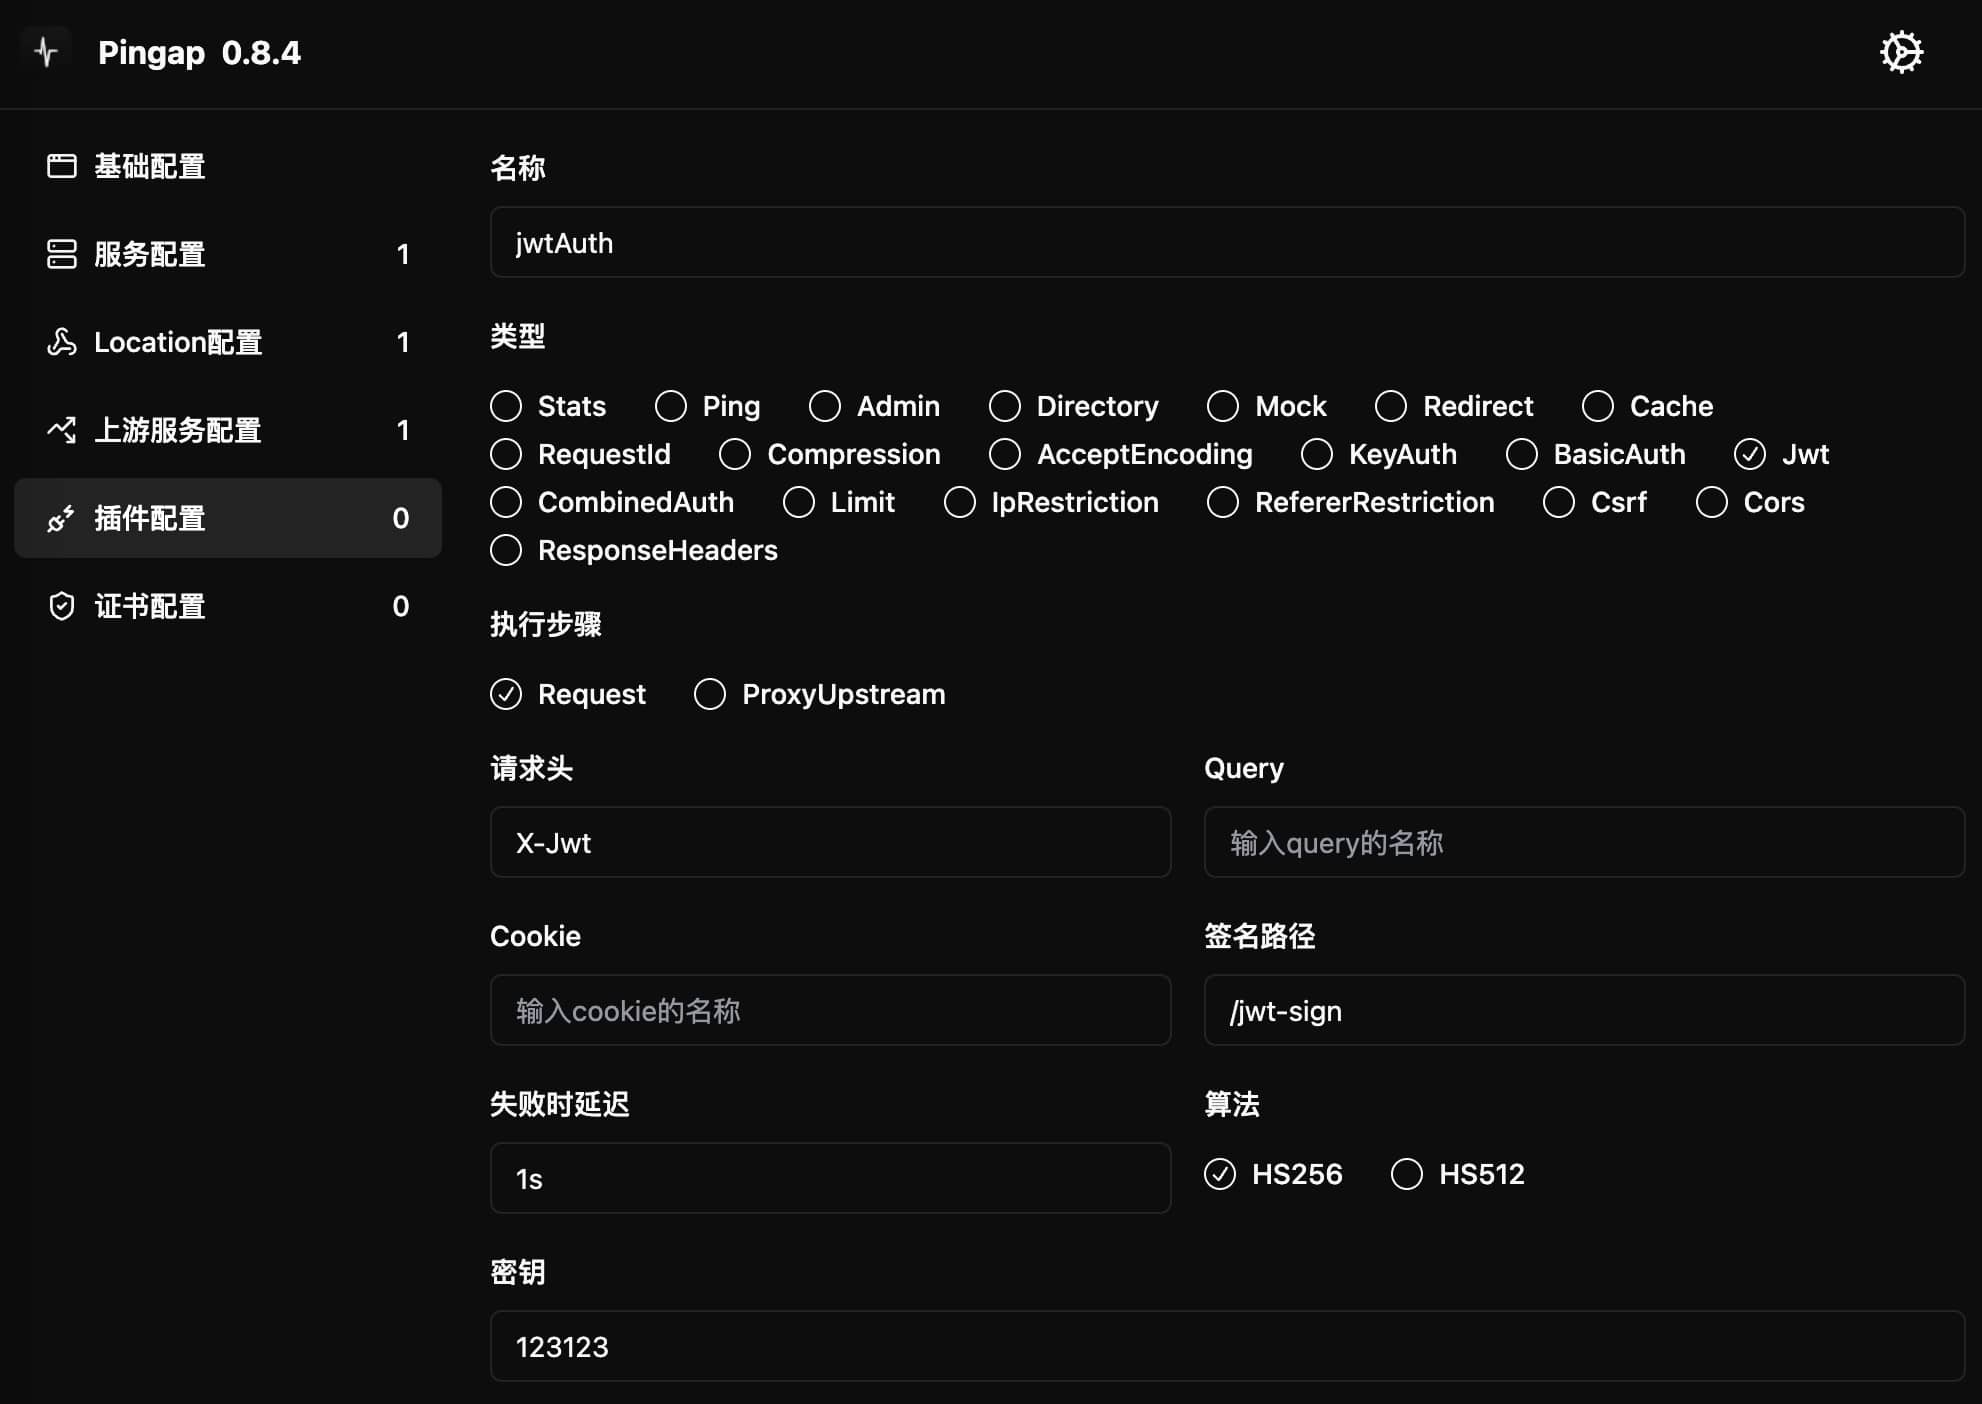
提供 JWT (JSON Web Token) 认证功能,该插件固定执行在request阶段。包含两个主要功能:
- 在指定路径生成 JWT token
- 验证请求中携带的 JWT token 是否有效
配置示例
[plugins.jwtAuth]
algorithm = "HS256"
auth_path = "/jwt-sign"
category = "jwt"
delay = "1s"
header = "X-Jwt"
secret = "123123"
配置参数
auth_path: 用于生成 JWT token 的路径- 访问该路径时,会将响应数据作为 payload 生成 token
algorithm: JWT 签名算法,目前支持 HS256secret: 签名密钥header: 从请求头获取 token 的字段名cookie: 从 cookie 获取 token 的字段名query: 从 URL 参数获取 token 的字段名- token 获取优先级: header > cookie > query
- 三个参数至少配置其中一个
delay: 认证失败时的响应延迟时间
工作流程
-
生成 token:
- 访问
auth_path配置的路径 - 将响应数据作为 payload 签名生成 token
- 返回生成的 token
- 访问
-
验证 token:
- 访问其他路径时,按优先级获取 token
- 验证 token 的签名和有效性
- 验证通过则继续处理,否则返回认证错误
CombinedAuth
提供基于应用 ID、密钥和时间戳的组合式认证机制。支持为每个应用配置独立的认证参数和 IP 白名单,该插件固定在request阶段执行。
配置示例
[plugins.appAuth]
category = "combined_auth"

[[plugins.appAuth.authorizations]]
app_id = "pingap"
deviation = 10
ip_list = [
    "192.168.1.1/24",
    "127.0.0.1",
]
secret = "123123"
配置参数
app_id: 应用标识符secret: 用于生成摘要的密钥deviation: 允许的时间戳偏差(单位:秒)- 用于处理客户端与服务器时间不完全同步的情况
ip_list: 允许访问的 IP 白名单- 支持单个 IP 和 CIDR 格式的网段
step: 插件执行时机,仅支持request
认证流程
-
客户端构造请求参数:
app_id: 配置的应用标识符ts: 当前时间戳digest: 通过 SHA256 算法计算得出的摘要值- 计算公式:
SHA256(secret:timestamp)
- 计算公式:
-
请求示例:
GET /api?app_id=pingap&ts=1727582506&digest=85c623c389177a69860adfd572212507ef98c197ba5105677919e0663eeae091
- 服务端验证:
- 检查请求 IP 是否在白名单中
- 验证时间戳是否在允许的偏差范围内
- 使用相同算法计算摘要并比对
Limit
提供基于多种条件的访问限制功能。支持并发数(inflight)和访问频率(rate)两种限制类型,可以根据 Cookie、请求头、URL 参数或 IP 地址进行限制。
配置参数
type: 限制类型inflight: 并发访问数限制rate: 访问频率限制
tag: 限制条件来源cookie: 从 Cookie 获取header: 从请求头获取query: 从 URL 参数获取ip: 基于访问者 IP
key: 获取限制值的字段名称- 使用
ip类型时无需指定
- 使用
max: 最大允许值interval: 统计时间间隔(仅用于 rate 类型)step: 插件执行时机,可选request或proxy_upstream。若设置为proxy_upstream再增加对应的缓存插件,则可只针对转发至upstream的请求才会增加次数
配置示例
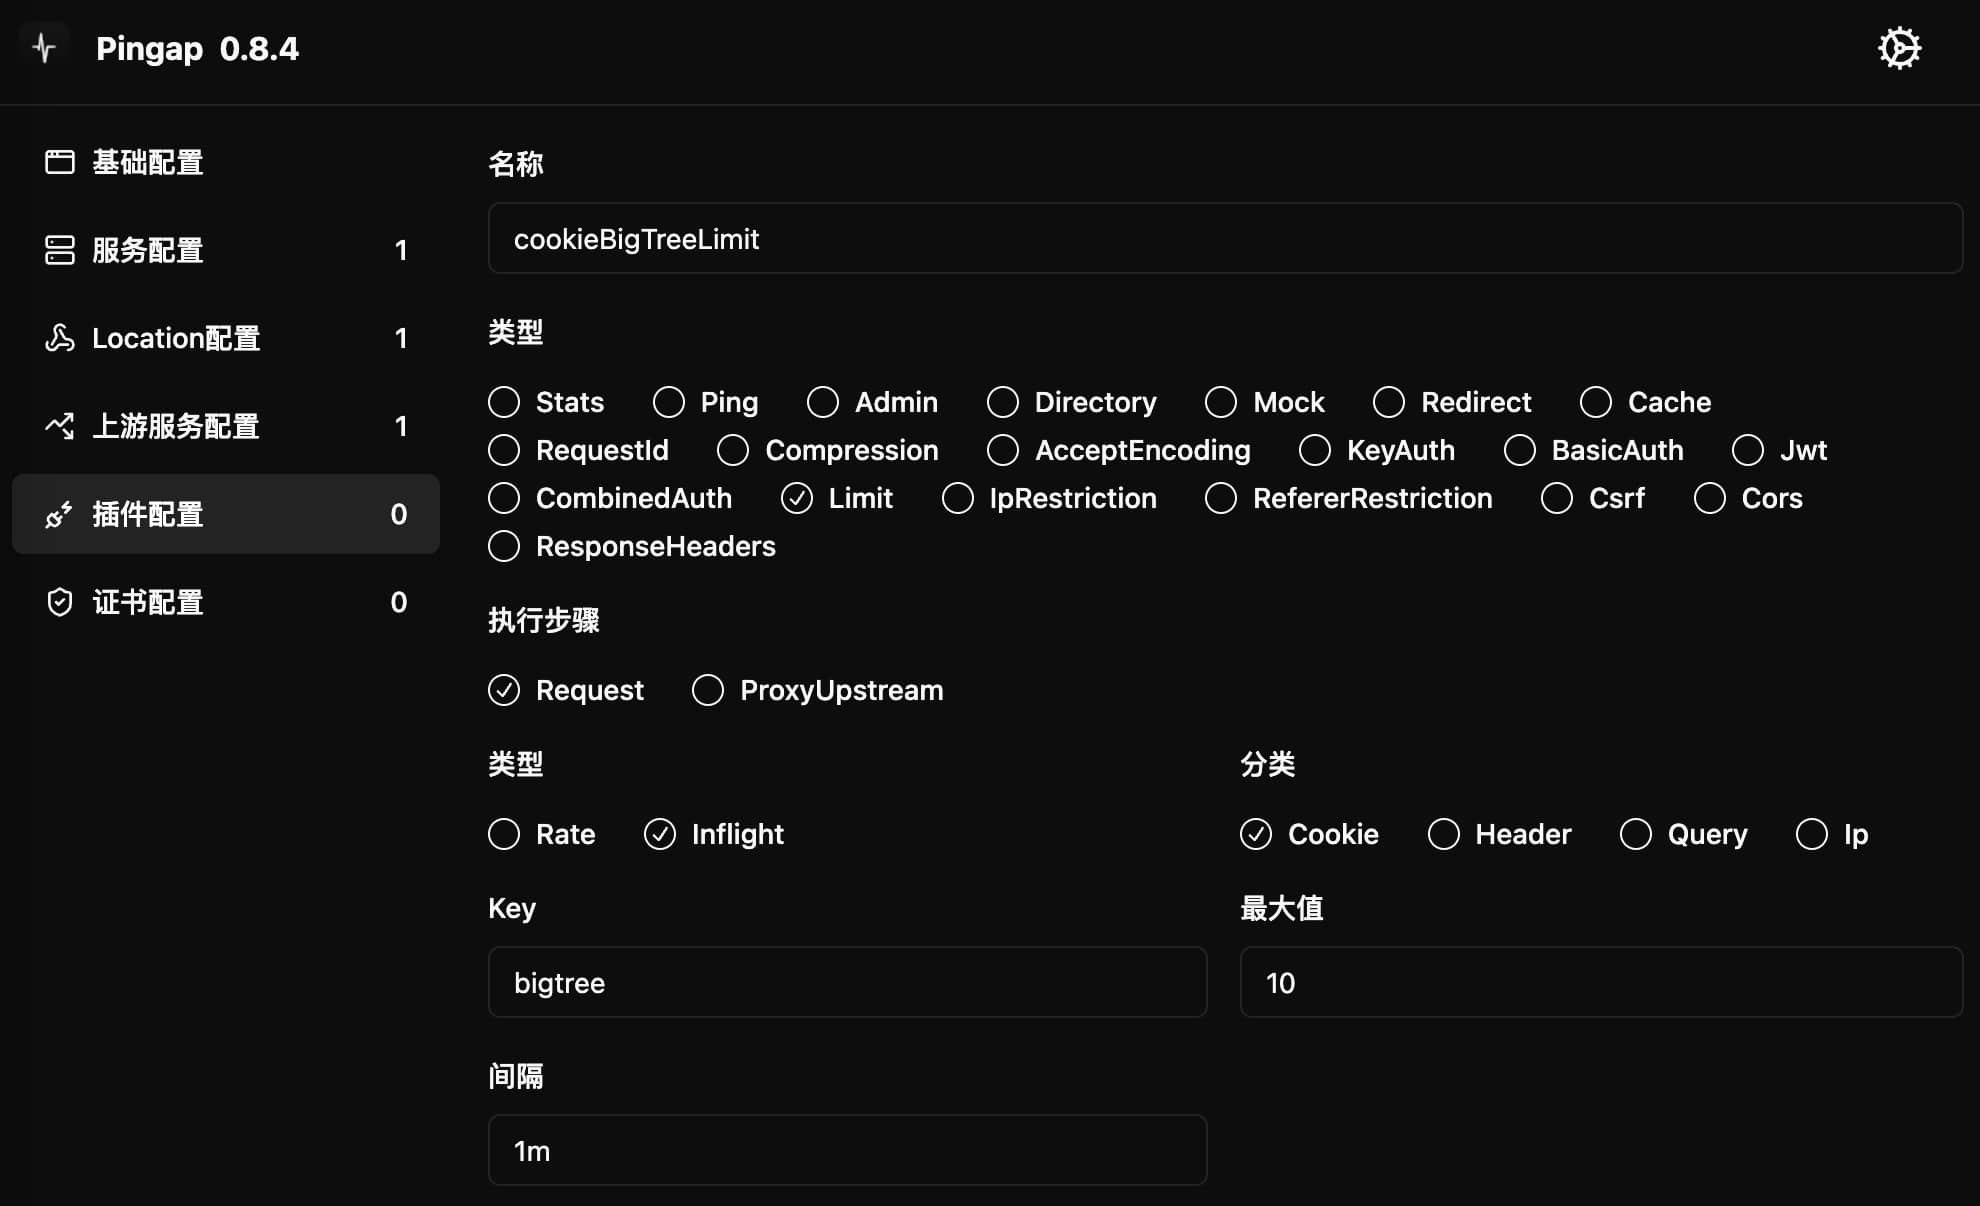
- 基于 Cookie 的并发限制:
[plugins.cookieBigTreeLimit]
category = "limit"
type = "inflight"
tag = "cookie"
key = "bigtree"
max = 10
step = "request"
- 基于请求头的并发限制:
[plugins.headerAppLimit]
category = "limit"
type = "inflight"
tag = "header"
key = "X-App"
max = 10
- 基于 URL 参数的频率限制:
[plugins.queryAppLimit]
category = "limit"
type = "rate"
tag = "query"
key = "app"
max = 10
interval = "1s"
- 基于 IP 的频率限制:
[plugins.ipLimit]
category = "limit"
type = "rate"
tag = "ip"
max = 10
interval = "1m"
补充说明
- IP 获取优先级: X-Forwarded-For > X-Real-Ip > Remote Addr
- 当限�制条件值为空时不进行限制
- 频率限制需要配置
interval参数 - 并发限制不需要配置
interval参数 - rate限制现仅简单的分区间限制,每次仅计算上一区间的访问频率是否超限,后续调整为两个区间按权重计算
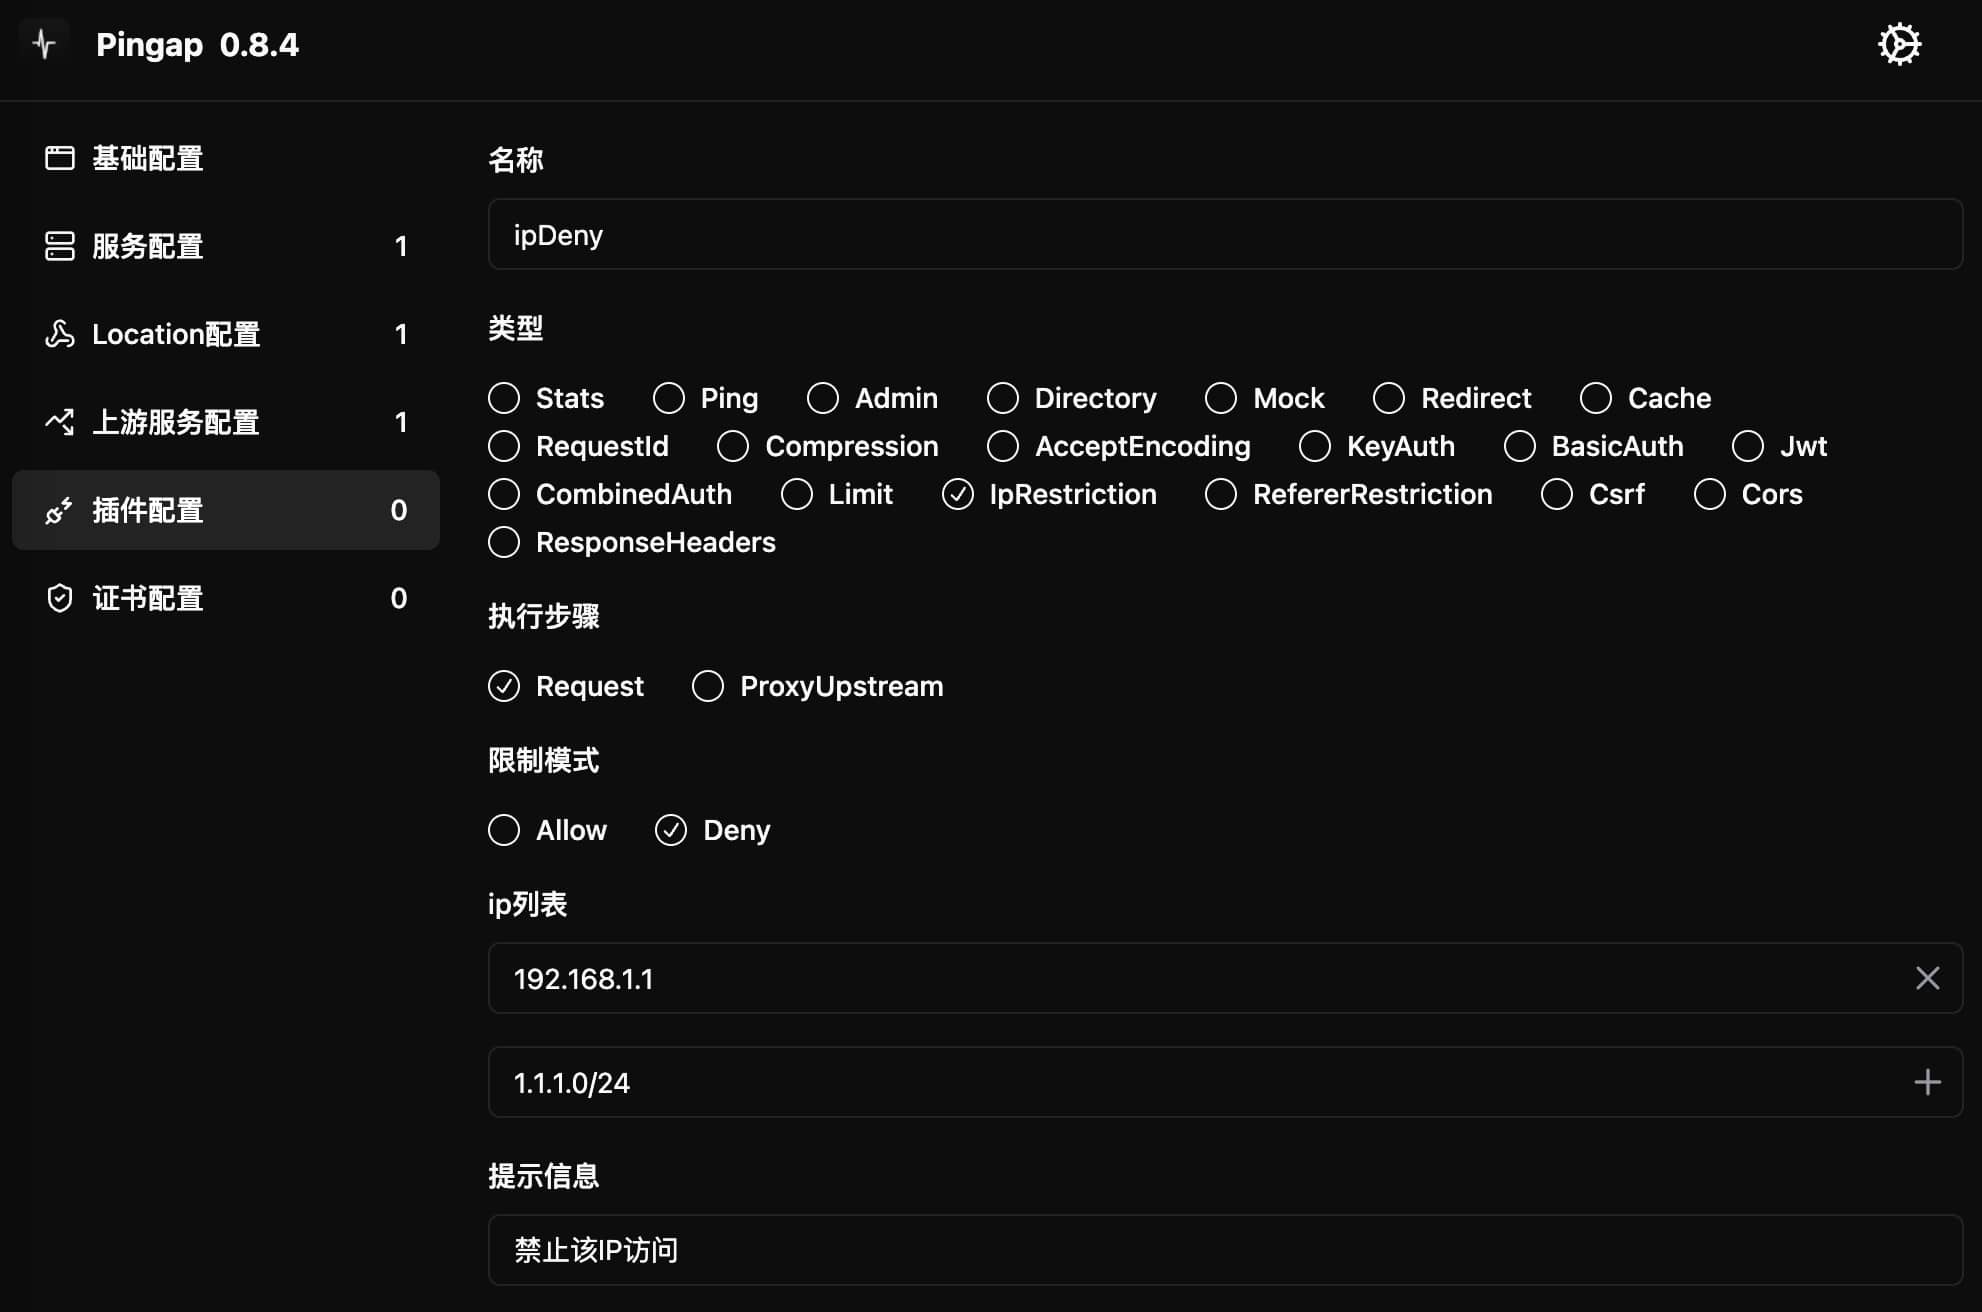
IpRestriction
提供基于 IP 地址的访问控制功能。支持设置允许(allow)或禁止(deny)两种模式,可配置单个 IP 地址或 CIDR 格式的网段,该插件固定执行在request阶段。
配置示例
[plugins.ipDeny]
category = "ip_restriction"
ip_list = [
    "192.168.1.1",      # 单个 IP 地址
    "1.1.1.0/24",       # CIDR 格式网段
]
message = "禁止该IP访问"
type = "deny"
配置参数
type: 访问控制模式allow: 仅允许列表中的 IP 访问deny: 禁止列表中的 IP 访问
ip_list: IP 地址列表- 支持单个 IP 地址
- 支持 CIDR 格式的网段
message: 访问被拒绝时的提示信息
使用说明
- 选择访问控制模式(允许/禁止)
- 添加需要控制的 IP 地址或网段
- 配置被拒绝访问时的提示信息
UaRestriction
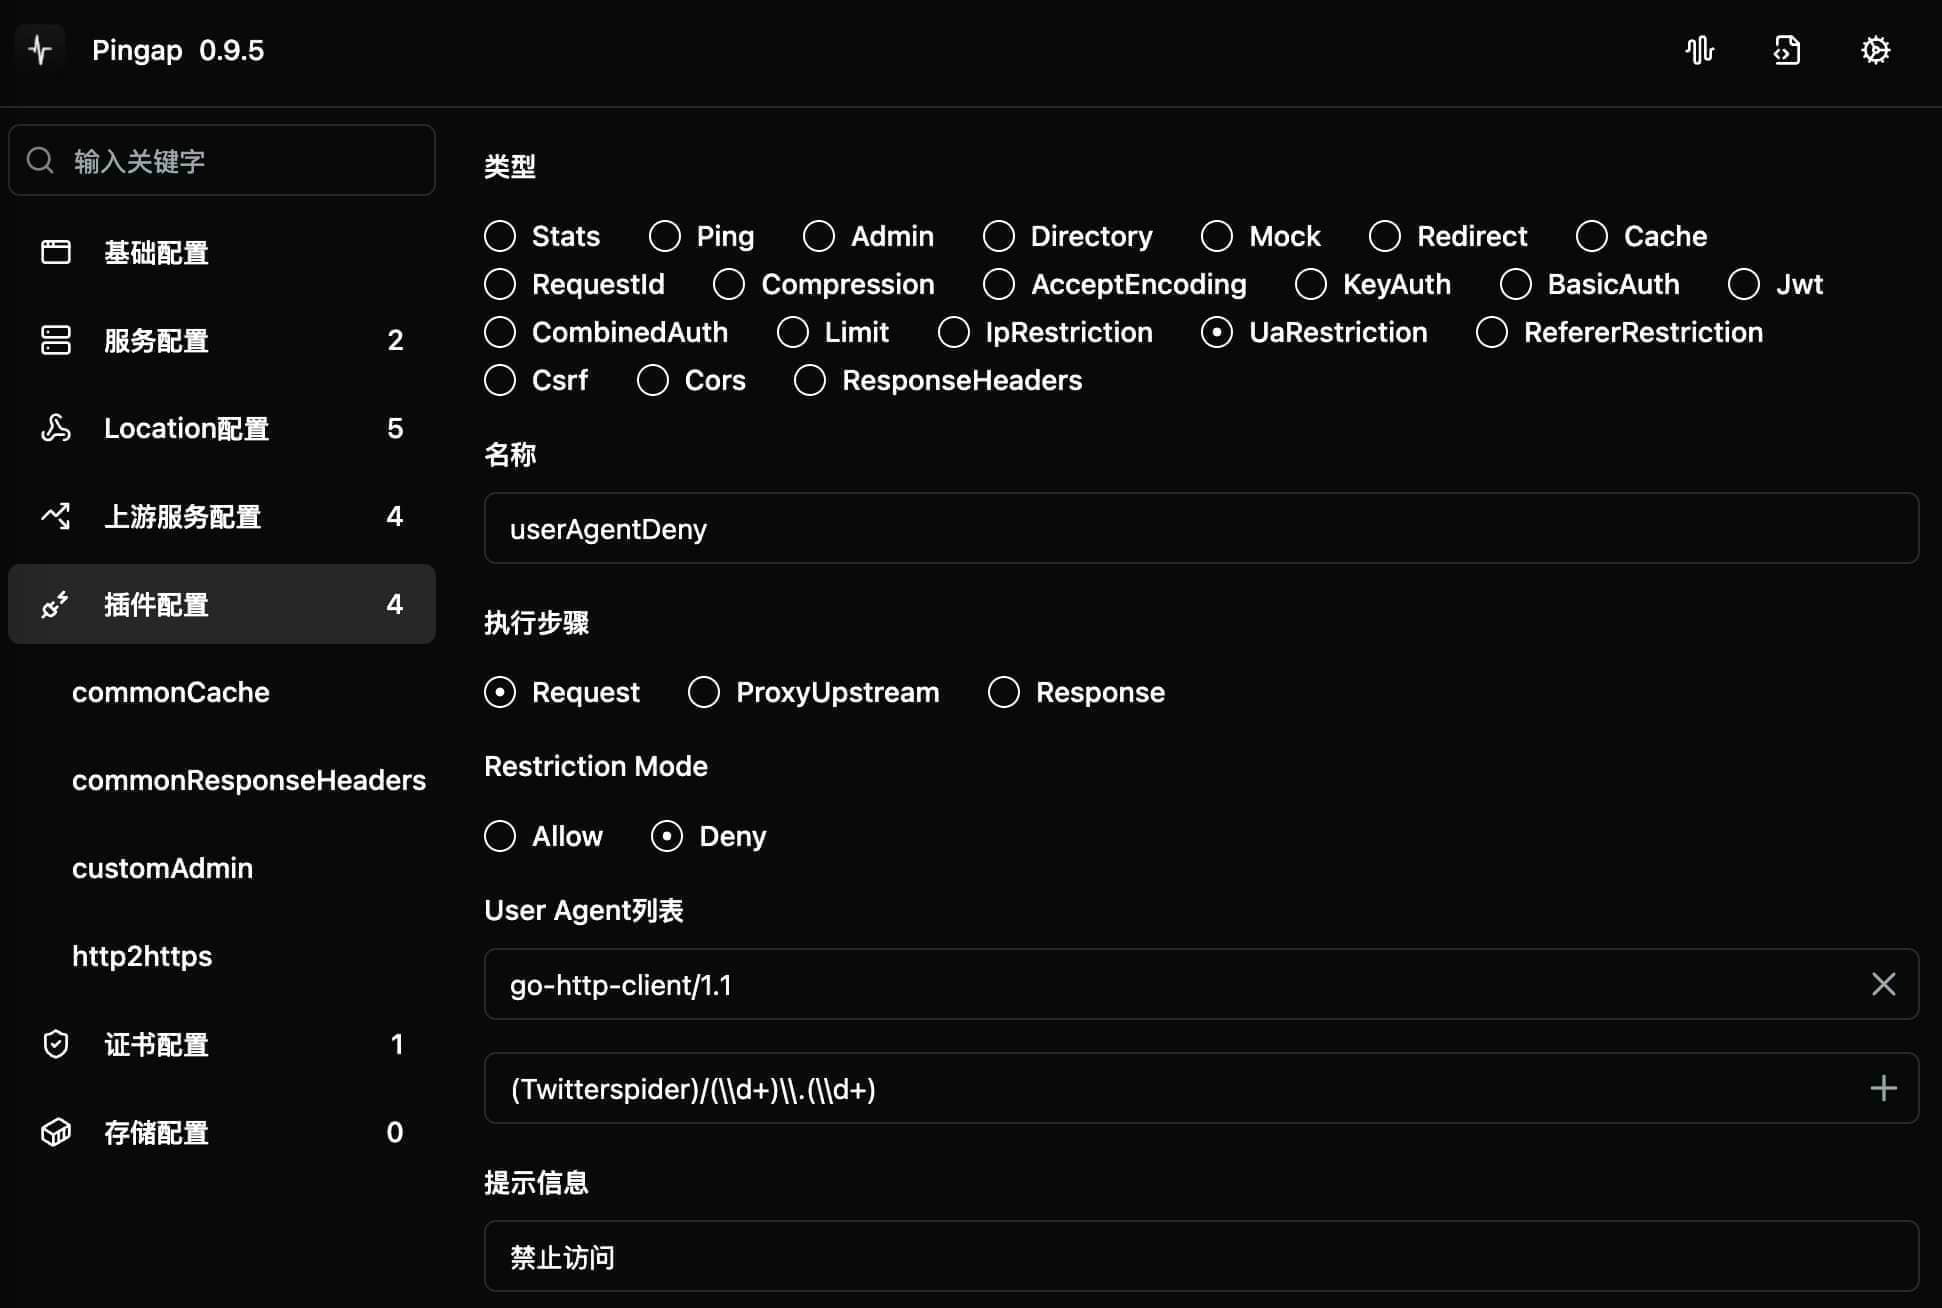
提供基于 User-Agent 的访问控制功能。支持设置允许(allow)或禁止(deny)两种模式,可使用正则表达式进行匹配。
配置示例
[plugins.userAgentDeny]
category = "ua_restriction"
ua_list = [
    "go-http-client/1.1",                  # 精确匹配
    "(Twitterspider)/(\\d+)\\.(\\d+)"     # 正则匹配
]
message = "禁止访问"
step = "request"
type = "deny"
配置参数
type: 访问控制模式allow: 仅允许列表中匹配的 User-Agentdeny: 禁止列表中匹配的 User-Agent
ua_list: User-Agent 匹配规则列表- 支持精确匹配
- 支持正则表达式匹配
message: 访问被拒绝时的提示信息step: 插件执行时机,仅支持request
使用说明
- 选择访问控制模式(允许/禁止)
- 添加 User-Agent 匹配规则
- 直接填写完整的 User-Agent 字符串进行精确匹配
- 使用正则表达式匹配特定模式的 User-Agent
- 配置被拒绝访问时的提示信息
RefererRestriction
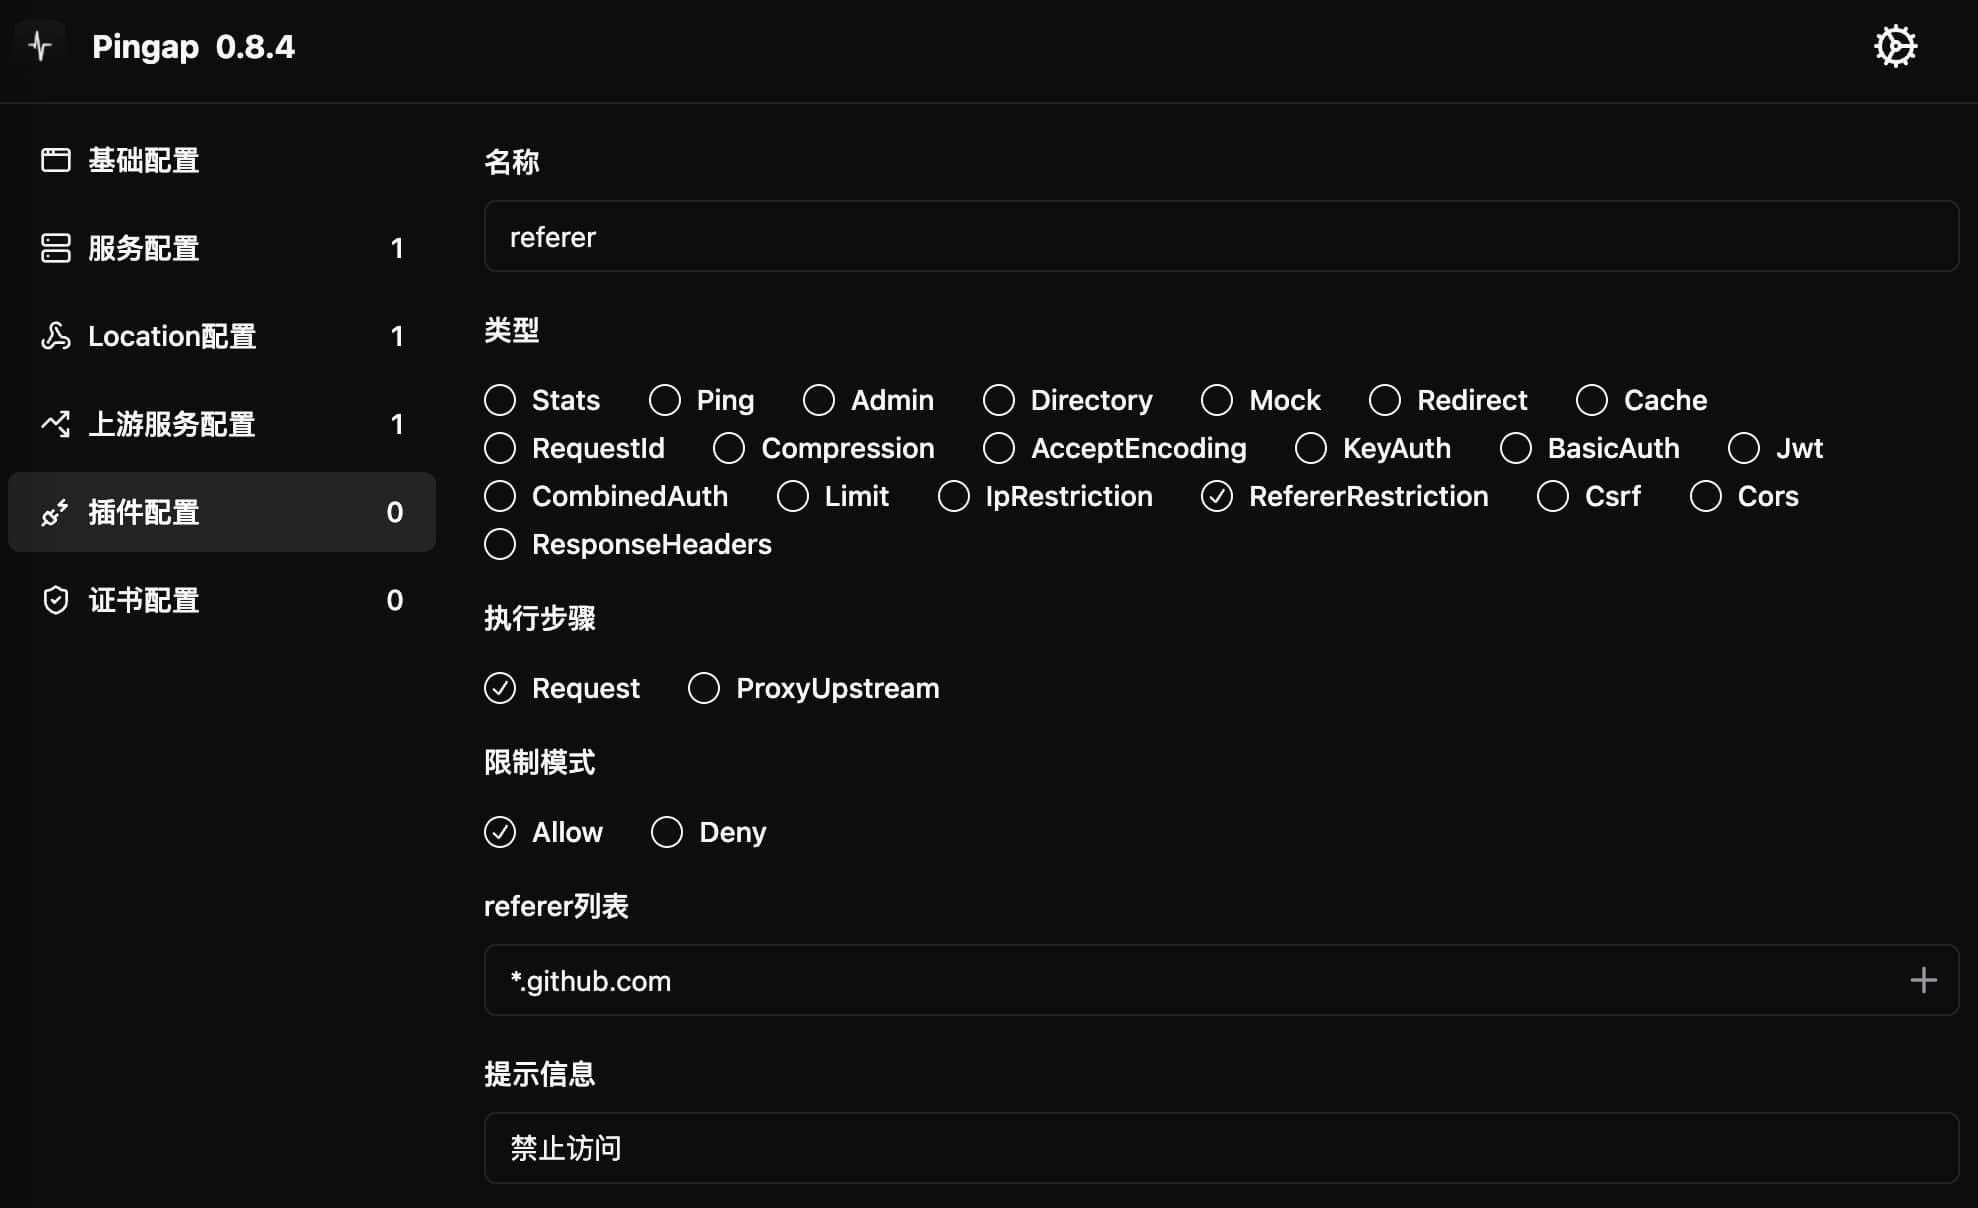
提供基于 HTTP Referer 的访问控制功能。支持设置允许(allow)或禁止(deny)两种模式,可使用通配符(*)进行域名匹配,该插件固定执行在request阶段。
配置示例
[plugins.referer]
category = "referer_restriction"
referer_list = [
    "*.github.com",     # 匹配所有 github.com 的子域名
    "example.com"       # 精确匹配
]
message = "禁止访问"
type = "allow"
配置参数
type: 访问控制模式allow: 仅允许列表中匹配的 Refererdeny: 禁止列表中匹配的 Referer
referer_list: Referer 匹配规则列表- 支持精确匹配
- 支持使用 * 作为通配符匹配子域名
message: 访问被拒绝时的提示信息
使用说明
- 选择访问控制模式(允许/禁止)
- 添加 Referer 匹配规则
- 直接填写域名进行精确匹配
- 使用
*.domain.com格式匹配所有子域名
- 配置被拒绝访问时的提示信息
CSRF
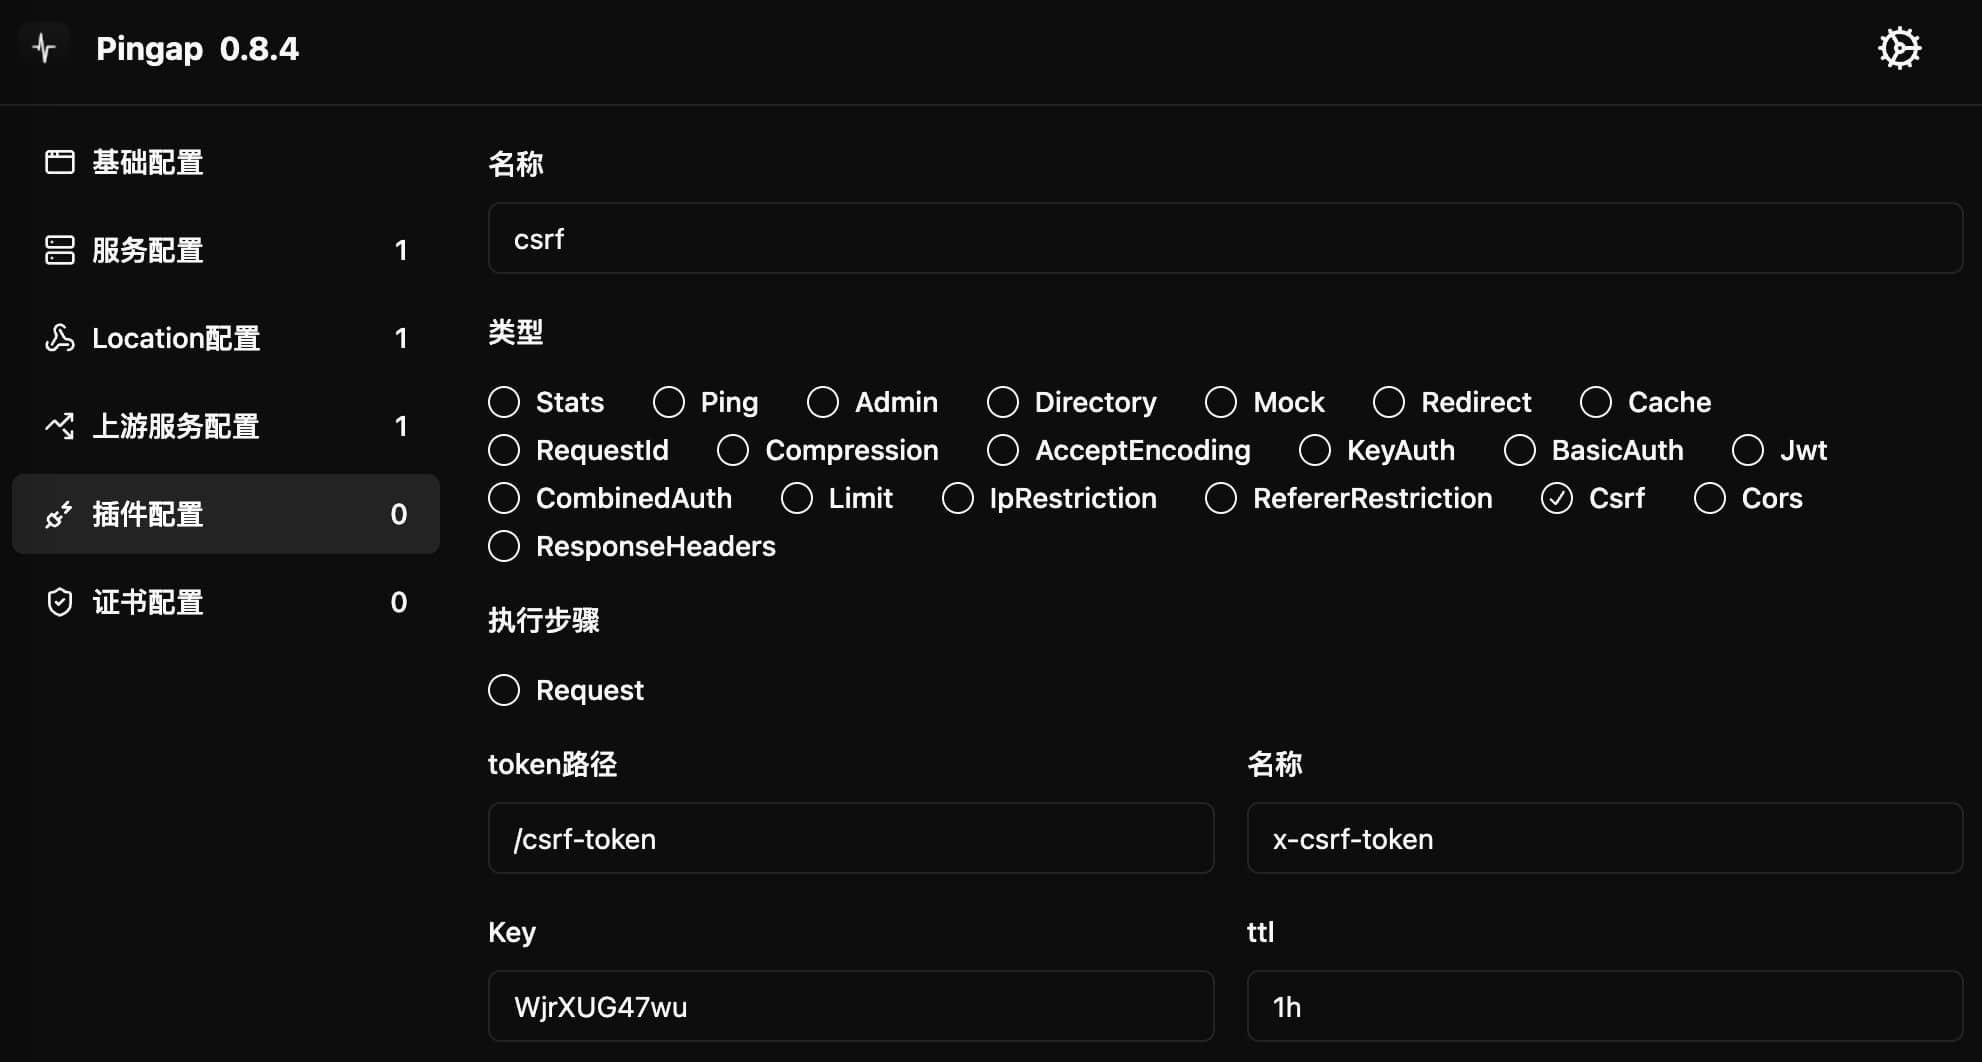
提供跨站请求伪造(Cross-Site Request Forgery)防护功能。通过比对请求中的 cookie 和请求头中的 token 值来验证请求的合法性,该插件固定在request阶段执行。
配置示例
[plugins.csrf]
category = "csrf"
key = "WjrXUG47wu"
name = "x-csrf-token"
token_path = "/csrf-token"
ttl = "1h"
配置参数
key: 用于生成 token 的密钥name: CSRF token 的名称- 用作 cookie 名和请求头名
token_path: 获取 token 的路径- 访问该路径时会生成新的 token
- 同时设置同名的 cookie,启用 SameSite 保护
ttl: token 的有效期step: 插件执行时机,仅支持request
工作流程
-
获取 token:
- 客户端访问
token_path配置的路径 - 服务器生成 token 并设置到 cookie 中
- cookie 设置为 SameSite 模式以增强安全性
- 客户端访问
-
请求验证:
- 客户端在请求头中携带 token
- 服务器比对请求头和 cookie 中的 token
- 若不一致则拒绝请求
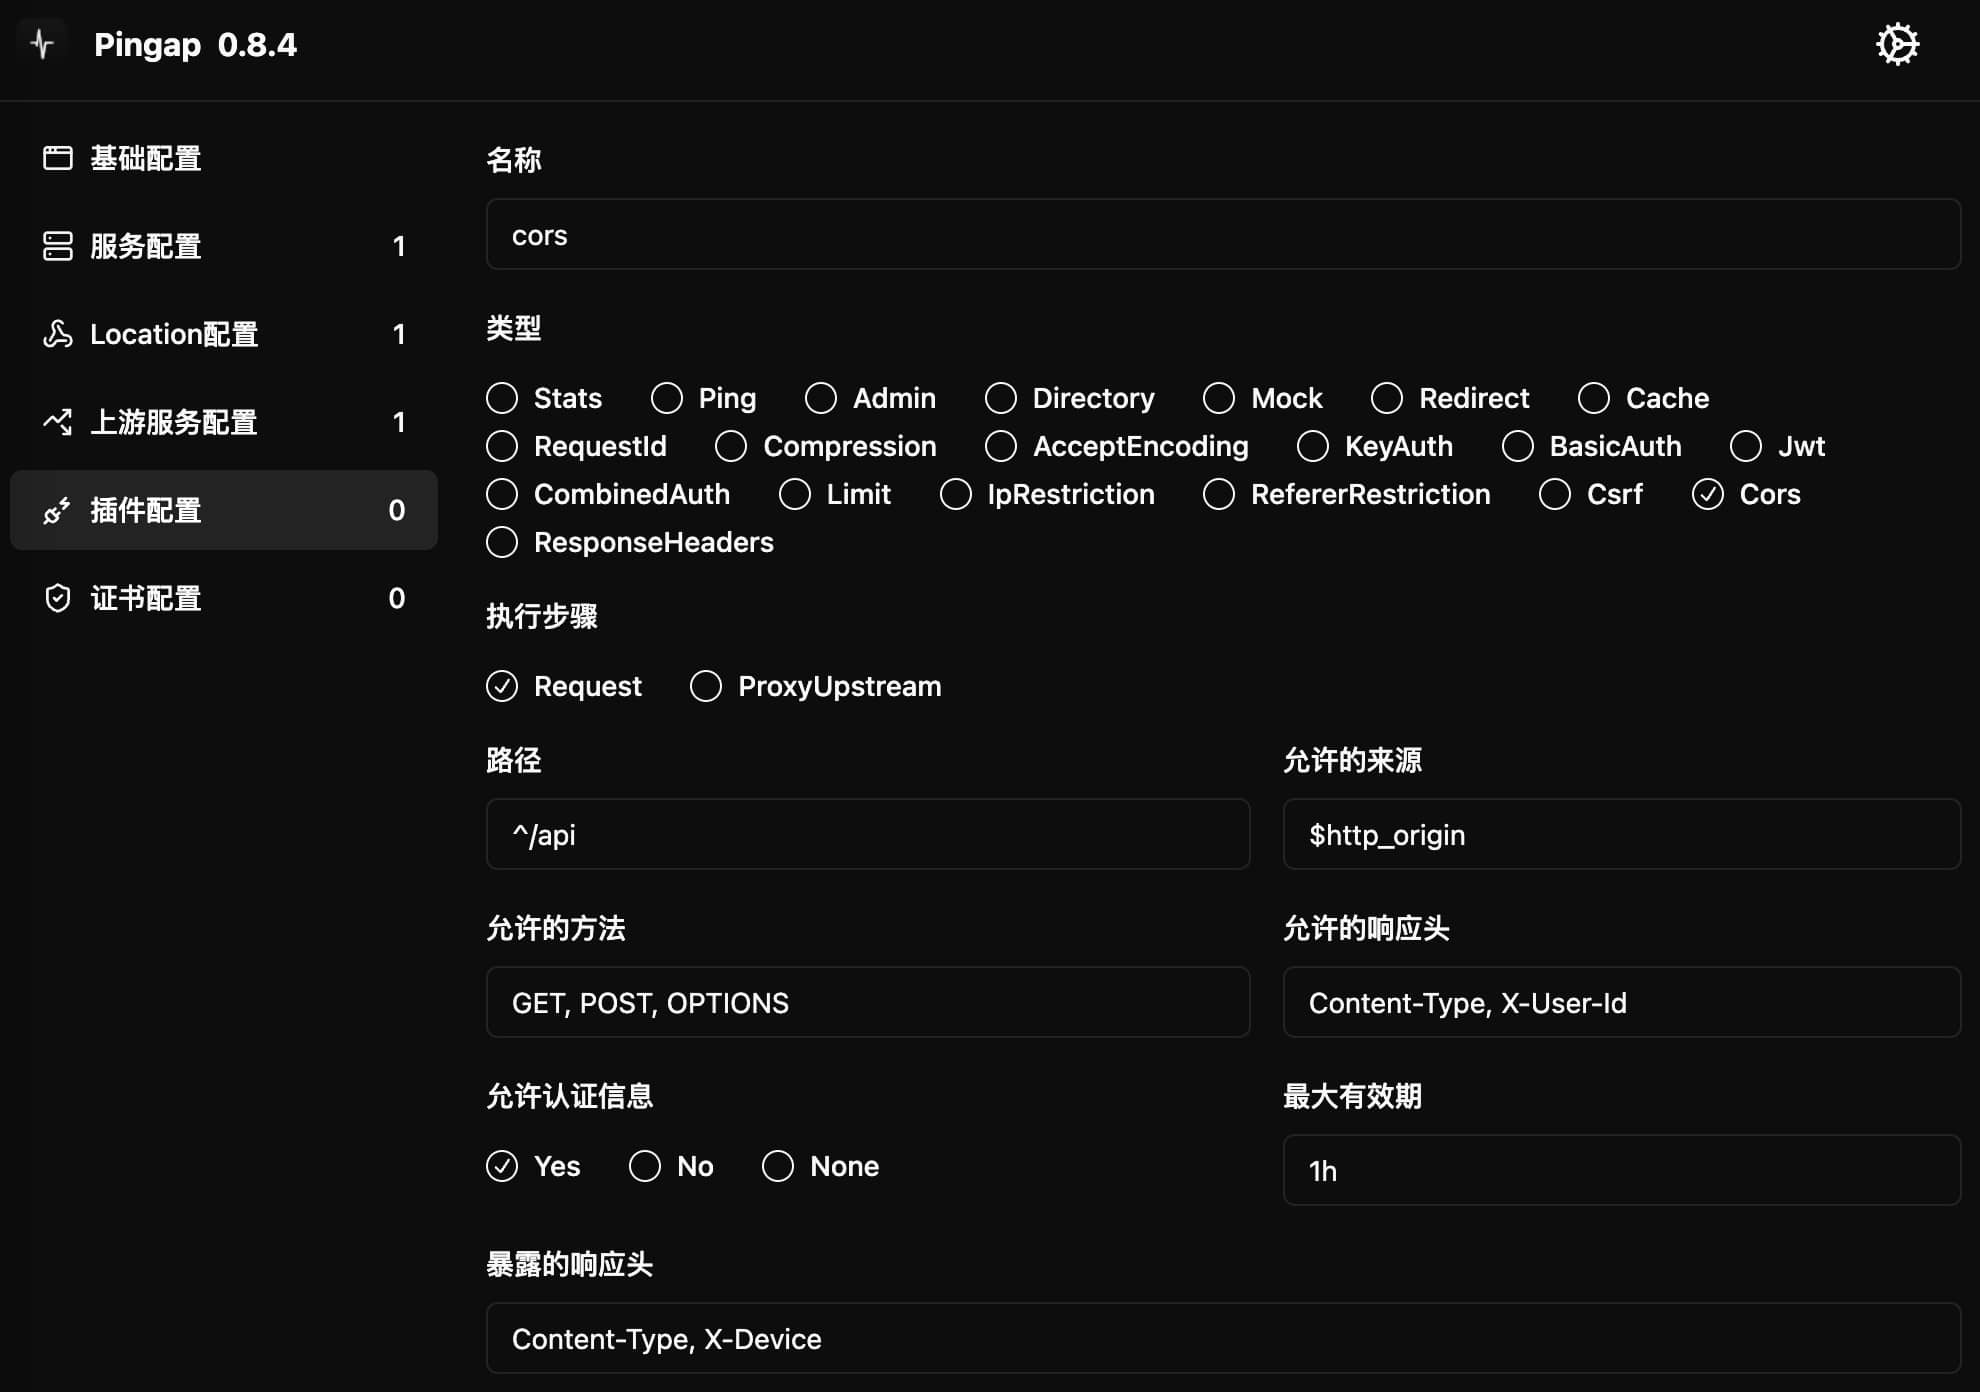
CORS
提供跨域资源共享(Cross-Origin Resource Sharing)配置功能,用于控制浏览器跨域访问策略,该插件固定在request阶段执行。
配置示例
[plugins.cors]
allow_credentials = true
allow_headers = "Content-Type, X-User-Id"
allow_methods = "GET, POST, OPTIONS"
allow_origin = "$http_origin"
category = "cors"
expose_headers = "Content-Type, X-Device"
max_age = "1h"
path = "^/api"
配置参数
allow_origin: 允许跨域请求的源- 可以指定具体域名,如
https://example.com - 设置为
$http_origin表示允许请求来源,不建议在生产环境使用 - 建议明确指定允许的域名列表,不建议直接使用
*
- 可以指定具体域名,如
allow_credentials: 是否允许携带认证信息- 包括 Cookie、HTTP 认证及客户端 SSL 证书
allow_methods: 允许的 HTTP 请求方法- 多个方法用逗号分隔,如
GET, POST, OPTIONS
- 多个方法用逗号分隔,如
allow_headers: 允许的自定义请求头,若不设置则默认所有- 多个请求头用逗号分隔
expose_headers: 允许浏览器访问的响应头- 默认情况下浏览器只能访问基本响应头
- 通过此参数可以暴露自定义响应头
max_age: 预检请求结果的缓存时间path: CORS 配置生效的路径范围- 支持正则表达式匹配
安全建议
- 避免使用
$http_origin,应明确指定允许的域名 - 仅配置必要的请求方法和请求头
- 谨慎配��置
allow_credentials,可能带来安全风险 - 合理设置
max_age以平衡性能和安全性
ResponseHeaders
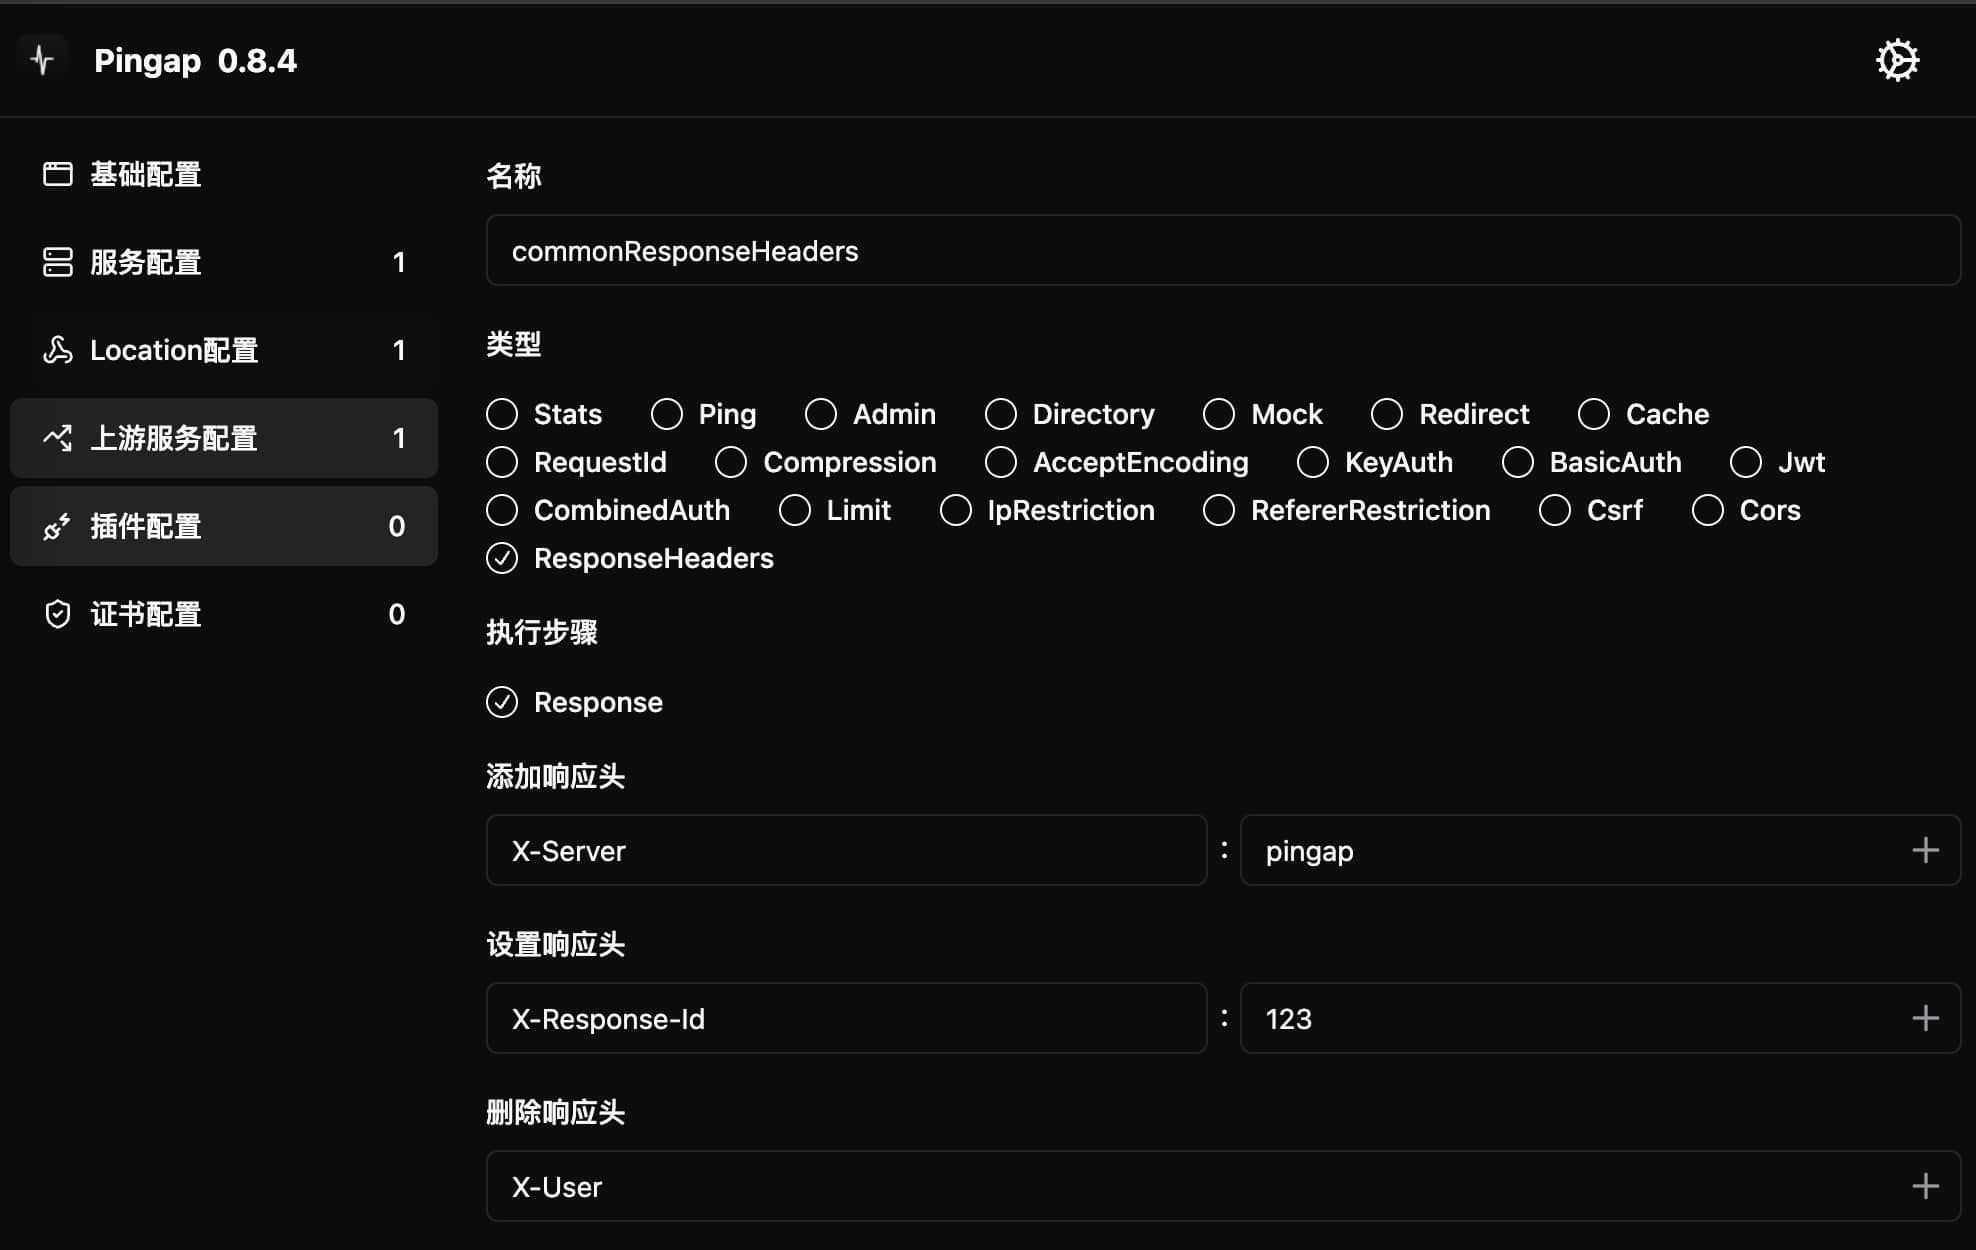
提供 HTTP 响应头的管理功能,支持添加、设置和删除响应头,该插件固定执行在response阶段。支持使用变量引用:
$hostname: 引用服务器主机名$变量名: 引用环境变量值
配置示例
[plugins.commonResponseHeaders]
add_headers = ["X-Server:pingap"]
category = "response_headers"
remove_headers = ["X-User"]
set_headers = ["X-Response-Id:123"]
rename_headers = ["x-old-header:x-new-header"]
set_headers_not_exists = ["x-server-ip:192.168.1.1"]
配置参数
add_headers: 需要添加的响应头- 不会覆盖已存在的同名响应头
set_headers: 需要设置的响应头- 会覆盖已存在的同名响应头
remove_headers: 需要删除的响应头- 删除指定名称的响应头
rename_headers: 需要重命名的响应头set_headers_not_exists: 如果响应头不存在才设置
执行顺序
操作按以下顺序执行:
add_headers: 添加新的响应头remove_headers: 删除指定的响应头set_headers: 设置(覆盖)响应头rename_headers: 重命名响应头set_headers_not_exists: 设置不存在的响应头
使用说明
- 根据需要配置要添加、设置或删除的响应头
- 每个配置项都是可选的,不需要的可以不设置
- 响应头的值可以使用变量:
$hostname获取服务器主机名$VARIABLE_NAME获取环境变量值
SubFilter
支持常规或正则形式的文本匹配,用于替换http的响应内容,该插件固定执行在response阶段。
[plugins.textReplace]
category = "sub_filter"
filters = [
    "subs_filter 'mobile' 'Mobile' ig",
    "sub_filter 'online' 'ONLINE'",
]
path = "^/api/"
配置参数
path: 匹配需要对响应改造的路径,按正则匹配filters: 配置内容替换规则,可以配置多条规则,支持两种类型subs_filter: 正则匹配替换模式sub_filter: 普通文本替换模式